Design in CSS: Colors, Fonts, and Themes

NOTE: This post was originally created as a lesson for my high school students. The target audience is beginners to web development.
Before I pretend like I know what I’m talking about, I am going to admit that I am relatively design deficient.
Don’t get me wrong. If you show me something that’s nicely designed, I’ll notice it. I have quality taste. What I lack is the ability to envision how something nice should look before it exists.
I’ve gotten better over the years. When I first started designing web applications from scratch, I struggled with formulating a system or program that I could follow with fidelity.
Since then, my planning skills have improved considerably. My career has brought me around a number of insanely talented design thinkers, and I’ve tried to internalize every nugget of wisdom those experts were willing to throw my way.
In this post, I’d like to share some of the thoughts and principles I’ve picked up during my programming journey. I’ll also attempt to articulate my planning process as a digestible action plan that you can use to design your own web projects.
The Outline
We’ll only look at a few core web design principles. Each concept has a significant role in the planning process, and is something you should think about when designing your next site.
- Colors
- Fonts
- CSS Variables
- Themes
Colors
Early on, it’s possible to get by only using color names. Colors like tomato, teal, and wheat can actually take you pretty far. Eventually though, you’re going to want to have more fine-grained control of your color choices.
When that day does come, you’ll have a few options to choose from. For most of my students, I recommend they start with rgb values. The best way to think about rgb (stands for red, green, blue) is to see how the computer uses them to represent pixels on a screen.
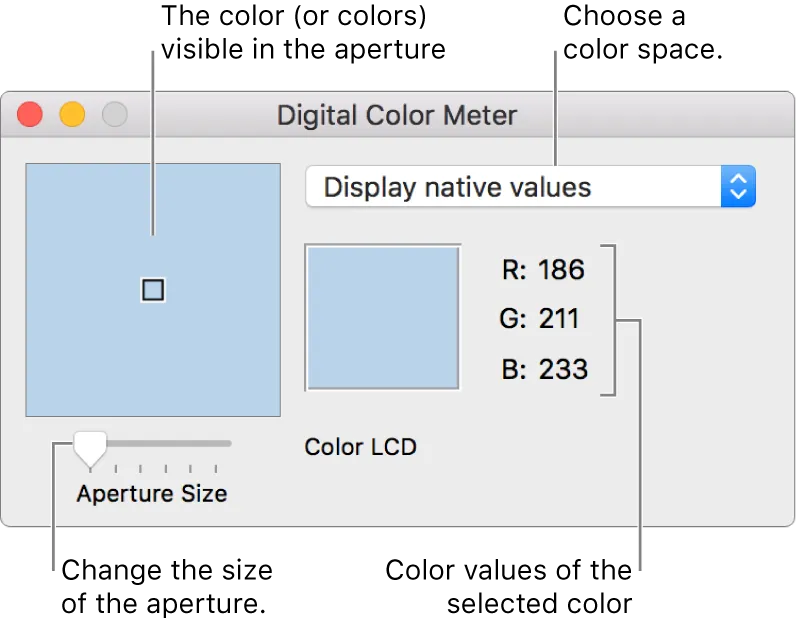
If you’re using a mac, click on the magnifying glass in the top right hand of your screen and enter in Digital Color Meter.
When you open up the application, you’ll see a floating window that indicates the rgb values for the pixel your mouse is currently hovering over. This is really useful for when you want to copy a particular color you see online.
To use rgb values in your CSS, simply assign them to your background, color, or border properties as necessary.
.black-bg {
  background: rgb(0, 0, 0);
}
.white-text {
  color: rgb(255, 255, 255);
}
.red-border {
  border: solid 1px rgb(255, 0, 0);
}
.gold-underline {
  border-bottom: solid 3px rgb(255, 215, 0);
}
Again, the first number in the rgb value represents how red the color should be, the second how green it should be, and the third how blue. Numbers range from 0 - 255 and can be combined to create essentially any color. Note that it’s also possible to add an alpha attribute to rgb. Using rgba(), we are able to specify a fourth value that determines the opacity of the color. Think of opacity as how see through it is.
Play around with this codepen taken from the Mozilla Developer Network to get a handle on how we select custom colors.
You’ll also notice that rgb values aren’t the only way to represent colors. We can also use Hex codes and HSL values, but we’ll save that for another post. If you want to dive further into color theory, start by reading this page in MDN.
So how do we go about selecting the right colors for our site?
Choosing a Color Palette
MDN offers some sound advice on the matter.
The first step is to choose your base color. This is the color that in some way defines your web site or the subject matter of the site. Just as we associate green with the beverage Mountain Dew and one might think of the color blue in relationship with the sky or the ocean, choosing an appropriate base color to represent your site is a good place to start.
After finding a base color, the next step is to find appropriate supporting colors. If you’re well versed in color theory, feel free to pick them yourselves. For normal citizens like myself, it’s probably best to use one of the freely available professional tools.
Personally, I’m partial to Adobe CC Online Color Wheel . The first co-teacher I ever worked with, Jamie Pilgrim , is a brilliant designer and web developer who put me on to this tool. Since then, I’ve toyed with others but always come back to Adobe CC for its style and simplicity.
Head to that link and try and create a color palette that matches your liking. Decide whether or not you’d like your colors to be complementary, analogous, monochromatic, etc. If you need inspiration, check out the explore tab for professionally curated color themes. I’ve spent hours digging through these before.
When you find something you like, save the colors to a CSS file.
Normally, it makes sense to select colors for the following:
- base color
- light base color
- dark base color
- secondary color
- accent color
- main text
- secondary text
- icons
Don’t worry if you don’t find the perfect combo of colors, we’ll play around with themes later in this post.
Fonts
Now that we’ve selected some colors, it’s time to look at typography.
Text is the primary means of communication on the web. Choosing nice fonts can improve the readability of a website, leading to more effective communication. For that reason alone, it is important to find a font that matches the website well.
The Google Fonts team offers sage advice in their choosing web fonts beginner’s guide .
Certain fonts work best in headlines, while others read well in paragraphs. Some font families are large enough to include international scripts and special characters. And if the font comes in a range of different styles (like italics or small caps) and weights (from hairline to ultra-black), it’ll offer more tools to fine-tune the design as the project comes together.
Generally, it makes sense to pick a font for header text and a font for paragraph text, and then call it quits. More than 2 or 3 different fonts looks sloppy. Instead of choosing many fonts, go for fonts that pair nicely with each other. Some good font pairing resources include things like:
When pairing fonts, visualizing the end result can often be tricky. It might help to see examples of the fonts in use, and then translate that to your use case. Use examples like the ones below as a guide.

Also, make your life easy. Use Google Fonts when you can. You’re more than welcome to download your own custom fonts and handle that business yourself. But until you’re sure you need something that Google Fonts doesn’t have, stick to what works.
Using Google Fonts is simple. First, go to Google Fonts and browse around until you find 1 or 2 fonts that you like. Click on the + icon in the top right of the font card to add it to your “font cart”.
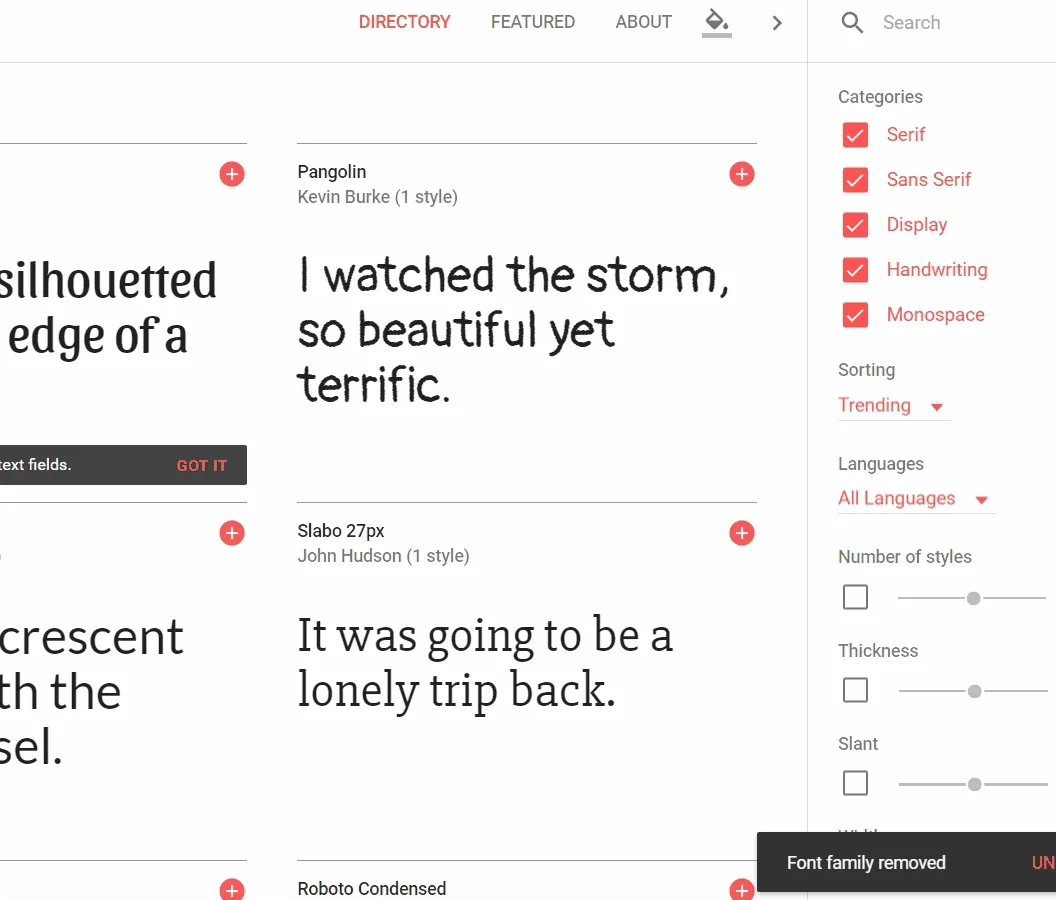
If you’re up for it, customize your font to include a range of sizes and strengths. Get a thin font, a bold font, an italics font, and whatever else you might need.
Then, open up your selected fonts, and click on the “@import” tab, and then copy the line of code that starts with @import. It should look something like this:
@import url("https://fonts.googleapis.com/css?family=Pangolin");
Paste this line in at the top of your CSS stylesheet.
You can now use the font in your styling, using the font-family property:
h1 {
  font-family: "Pangolin";
}
That’s all there is to it!
You might feel like this was too easy. Maybe this whole font thing isn’t that complicated?
Trust me, that’s not true. I lived with a designer for 5 years who specialized in text and fonts. While I’d like to say I absorbed her wisdom via osmosis, I actually spent most of my time marveling at how well she was able to weave typography into her design. Being an expert requires years of practice and refinement.
However, that’s not what we’re striving for in this post. My goal here isn’t to make you a typography expert (I’m certainly not). I just want to impart enough know-how to give you the ability to tinker.
CSS Variables
After selecting the right colors and the right fonts, we can now start getting some code onto the page.
Let’s say that we’d like to build a baby name picker application.
For colors, we could choose between baby blue, light pink, or any other color that accurately represents our app. For this demo, we’ll go with a deep purple - rgb(103, 58, 183) to be exact. For an accent color, we’ll grab highlighter pink - rgb(255, 105, 180).
With the main color decisions made, it’s time to get something on the page.
<!doctype html>
<html lang="en">
  <head>
    <title>Baby Name Picker</title>
    <meta charset="UTF-8" />
    <meta name="viewport" content="width=device-width" />
    <link rel="stylesheet" href="styles.css" />
  </head>
  <body>
    <div class="bg" />
    <main>
      <h1>Baby Name Picker</h1>
      <p>
        Find your baby the perfect name by using our baby name picking algorithm. If you have a unique name to add to
        our baby name database, feel free to submit them below.
      </p>
      <div class="interaction">
        <button id="theme1">Theme 1</button>
        <button id="theme2">Theme 2</button>
        <input placeholder="New Baby Name" />
        <button>Submit</button>
      </div>
    </main>
  </body>
</html>
*,
*::after,
*::before {
  box-sizing: border-box;
}
body {
  margin: 0;
  font-family: sans-serif;
  font-size: 20px;
  background: rgb(242, 242, 242);
}
.bg {
  position: absolute;
  height: 200px;
  background: rgb(83, 38, 163);
  border-bottom: solid 6px rgb(255, 105, 180);
  width: 100vw;
  z-index: -1000;
}
main {
  width: 80vw;
  background: white;
  border: solid 1px rgb(202, 202, 202);
  min-height: 60vh;
  box-shadow: 0px 1px 2px 0px rgb(202, 202, 202);
  margin-left: 10vw;
  transform: translateY(140px);
  padding: 16px;
}
.interaction {
  display: flex;
  justify-content: flex-start;
}
button {
  padding: 8px 13px;
  font-size: 1.2rem;
  color: white;
  background: rgb(83, 38, 163);
  border-radius: 4px;
  cursor: pointer;
  margin-left: 2px;
}
input {
  margin-left: auto;
  padding: 8px 13px;
  font-size: 1.2rem;
  background: rgb(242, 242, 242);
  border-radius: 4px;
  border: solid 1px rgb(202, 202, 202);
}
input:focus,
button:focus {
  outline: none;
}
input:focus {
  background: white;
}

@media screen and (max-width: 800px) {
  .interaction {
    display: grid;
    grid-template-columns: 1fr 1fr;
    grid-row-gap: 20px;
  }
  .interaction input {
    width: 100%;
  }
}
The code above produces the results seen here:
We see our color theme applied nicely to our page, and we also see that our page is in dire need of better font choices. Let’s fix that.
Head to google fonts and select the Comfortaa and Lato fonts. We’ll use these two as our font pairing.
The code to import those two fonts is as follows:
@import url("https://fonts.googleapis.com/css?family=Comfortaa|Lato");
Add that to the top of the CSS file and we can then use those fonts in our css. Tell the h1, button, and input to have a font-family: Comfortaa, while giving the body font-family: Lato.
What a difference some nice fonts make. And with those additions, we’ve completed our basic theme. While this is nice and could by all means be done, we can do better.
As we fill in the fonts, colors, and spaces, we end up repeating a lot of code. Down the road, if we wanted to change the color theme for our site, we’d need to replace every color at every location.
Fortunately, there’s a better way. One of the best recent development in web development is CSS Custom Properties. Also known as CSS Variables, this new addition to CSS reduces repetition, increases readability, and alleviates the mental strain on developers.
To declare a variable, create a :root pseudo class selector and define variables as statements in this rule. The :root pseudo class corresponds directly to the root of your DOM - usually the <html> tag.
:root {
  --color-bg: rgb(83, 38, 163);
  --color-accent: rgb(255, 105, 180);
  --color-button: rgb(83, 38, 163);
  --color-button-text: rgb(255, 255, 255);
  --color-body-bg: rgb(255, 255, 255);
  --font-header: Comfortaa;
  --font-main: Lato;
}
The primary rule to follow is to begin all variable names with two dashes --, and access them in your css like so:
h1 {
  font-family: var(--font-header);
}
All CSS variables are available to the DOM as well, so we can manipulate variables with JavaScript or change the theme of specific elements with very little code
Let’s see how we would go about that.
Themes
While it’s often sufficient to place all variables in the :root pseudo class, it can be equally effective to place them as children of an element with a data-theme attribute.
Add this code to the body tag of your page:
<body data-theme="theme-1">
  <!-- ...the rest of your html -->
</body>
Feel free to give the data-theme attribute whatever value you like - it’s arbitrary. Then, add the following code to your css file:
[data-theme="theme-1"] {
  --color-bg: rgb(83, 38, 163);
  --color-accent: rgb(255, 64, 129);
  --color-button-bg: rgb(83, 38, 163);
  --color-button-text: rgb(255, 255, 255);
  --color-body-bg: rgb(242, 242, 242);
}
The selector [data-theme="theme-1"] finds the element with the attribute data-theme equal to “theme-1”. All children of this element (in this case, anything inside the body tag) will inherit these variables.
And if we can have one theme, why not two? I’ve gone ahead and picked a few new colors so we can see our new theme in action.
[data-theme="theme-2"] {
  --color-bg: rgb(137, 207, 240);
  --color-accent: rgb(82, 12, 232);
  --button-bg: rgb(137, 207, 240);
  --button-color: rgb(10, 10, 10);
  --color-body-bg: rgb(255, 255, 255);
}
We’ll leave the font variables in the root class, as they’ll apply to both themes. Our site will now look like the codepen below:
With proper color selections handled, we can add a tiny bit of JavaScript to switch between each theme easily.
document.querySelector("#theme1").addEventListener("click", (e) => {
  document.body.setAttribute("data-theme", "theme-1")
})

document.querySelector("#theme2").addEventListener("click", (e) => {
  document.body.setAttribute("data-theme", "theme-2")
})
These two click handlers allow us to easily convert between themes on our site, showcasing the power of CSS Variables. And ta-da! Click the theme 1 and theme 2 buttons to see it in action.
Play around with this codepen and add your own themes if you’d like.
Wrapping Up and Resources
- Improve Your Design with the Principles of Similarity and Proximity - https://www.smashingmagazine.com/2016/05/improve-your-designs-with-principles-similarity-proximity-part-1/
- Color Theory for Designers - Lovely infographic on color and how to think about them. https://uxdesign.cc/color-theory-for-designers-a-crash-course-with-infographic-41d8b4c45619
- NYU CS: Color Theory - Basic introduction to color theory in a short snippet. https://cs.nyu.edu/courses/fall02/V22.0380-001/color_theory.htm
- Smashing Magazine: Visual Perception and Gestalt Principles - https://www.smashingmagazine.com/2014/03/design-principles-visual-perception-and-the-principles-of-gestalt/
- Vanseo Design: Gestalt Principles - http://vanseodesign.com/web-design/gestalt-principles-of-perception/
- VITSOE - The Power of Good Design. https://www.vitsoe.com/us/about/good-design
- MDN: Applying Color - https://developer.mozilla.org/en-US/docs/Web/HTML/Applying_color
- Web Design is 95% Typography - Author lays out a compelling argument for why understanding typography is central to understanding web design. Also offers some fantastic books for those looking to get more into design and fonts. https://ia.net/topics/the-web-is-all-about-typography-period
- Google Design: Choosing Web Fonts - Google Font’s step-by-step guide to choosing the right font(s) for your site. https://design.google/library/choosing-web-fonts-beginners-guide/
- Creative Bloq: 100 Free Fonts for Designer - https://www.creativebloq.com/graphic-design-tips/best-free-fonts-for-designers-1233380
- Invision: Big List of Typography Resources - https://www.invisionapp.com/inside-design/free-typography-resources/
- Canva: Typography Terminology - https://www.canva.com/learn/typography-terms/
- Butterick’s Practical Typography - https://practicaltypography.com/

Using Python to Calculate Dice Statistics

How to Make Websites Interactive with JavaScript