Auth Dependencies in FastAPI
UPDATED ON:

Welcome to Part 8 of Up and Running with FastAPI. If you missed part 7, you can find it here .
This series is focused on building a full-stack application with the FastAPI framework. The app allows users to post requests to have their residence cleaned, and other users can select a cleaning project for a given hourly rate.
Up And Running With FastAPI
Last post we removed code that saved our users’ password in plaintext, and replaced it with a more production-ready authentication system. We implemented an AuthService class that hashes users’ passwords and returns JSON Web Tokens that we’ll use to allow members to interact with authenticated API endpoints. In this post we’ll take that a step further and start building out some of those authenticated endpoints. By the end of the article, users should be able to log in and request protected information about their own accounts.
Login Flow
Let’s talk about the login mechanism we’ll be expecting our application to follow here. The FastAPI docs have a section on security, which discusses this in greater detail.
The docs outline a general login flow that we’ll attempt to architect.
- The user types her username and password in the frontend, and hits Enter.
- The frontend (running in the user’s browser) sends that username and password to a specific URL in our API.
- The API checks that username and password, and responds with a “token”.
- A “token” is just a string with some content that we can use later to verify this user.
- Normally, a token is set to expire after some time.
- So, the user will have to login again at some point later.
- And if the token is stolen, the risk is less. It is not like a permanent key that will work forever (in most of the cases).
- The frontend stores that token temporarily somewhere.
- The user clicks in the frontend to go to another section of the frontend web app.
- The frontend needs to fetch some more data from the API.
- But it needs authentication for that specific endpoint.
- So, to authenticate with our API, it sends a header Authorization with a value of Bearer plus the token.
- If the token contains foobar, the content of the Authorization header would be: Bearer foobar.
As before, we’ll write some tests and then make them pass.
TDD for a Login Endpoint
Let’s open up our test_users.py file and add a new class.
# ...other code
class TestUserLogin:
async def test_user_can_login_successfully_and_receives_valid_token(
self, app: FastAPI, client: AsyncClient, test_user: UserInDB,
) -> None:
client.headers["content-type"] = "application/x-www-form-urlencoded"
login_data = {
"username": test_user.email,
"password": "heatcavslakers", # insert user's plaintext password
}
res = await client.post(app.url_path_for("users:login-email-and-password"), data=login_data)
assert res.status_code == HTTP_200_OK
# check that token exists in response and has user encoded within it
token = res.json().get("access_token")
creds = jwt.decode(token, str(SECRET_KEY), audience=JWT_AUDIENCE, algorithms=[JWT_ALGORITHM])
assert "username" in creds
assert creds["username"] == test_user.username
assert "sub" in creds
assert creds["sub"] == test_user.email
# check that token is proper type
assert "token_type" in res.json()
assert res.json().get("token_type") == "bearer"
@pytest.mark.parametrize(
"credential, wrong_value, status_code",
(
("email", "wrong@email.com", 401),
("email", None, 401),
("email", "notemail", 401),
("password", "wrongpassword", 401),
("password", None, 401),
),
)
async def test_user_with_wrong_creds_doesnt_receive_token(
self,
app: FastAPI,
client: AsyncClient,
test_user: UserInDB,
credential: str,
wrong_value: str,
status_code: int,
) -> None:
client.headers["content-type"] = "application/x-www-form-urlencoded"
user_data = test_user.dict()
user_data["password"] = "heatcavslakers" # insert user's plaintext password
user_data[credential] = wrong_value
login_data = {
"username": user_data["email"],
"password": user_data["password"], # insert password from parameters
}
res = await client.post(app.url_path_for("users:login-email-and-password"), data=login_data)
assert res.status_code == status_code
assert "access_token" not in res.json()
We’ve written enough tests at this point that we’re probably pretty familiar with what’s going on. Even so let’s talk about what we’re expecting.
First things first, a user sends their email and password to our login point as form data and not JSON (using the “username” and “password” keys outlined by FastAPI in the docs here ). Accordingly, in both tests we’re updating the content-type header to accept form data instead of JSON. This matches the same OAuth2 specs mentioned before and is required to use some of the FastAPI imports we’ll discuss in a minute.
For our first test, we check to make sure the response is valid, that the response includes a valid token, and that the token encodes the correct username and email for our test user. In the second test, we make sure that if any of that is incorrect, we get the proper status code and no token.
Notice in both tests how we’re not using the json parameter for sending data with our httpx client. Instead we use the data parameter. This is intentional and is how httpx expects form data to be sent in our client.
Now all we need to do is implement our login endpoint!
The LOGIN Endpoint
We might assume that this part should be relatively simple, since we already implemented user registration. However, this section is still pretty involved, so strap in.
Let’s start with the login route.
# ...other code
from starlette.status import (
HTTP_200_OK,
HTTP_201_CREATED,
HTTP_400_BAD_REQUEST,
HTTP_401_UNAUTHORIZED,
HTTP_404_NOT_FOUND,
HTTP_422_UNPROCESSABLE_ENTITY,
)
from fastapi.security import OAuth2PasswordRequestForm
# ...other code
@router.post("/login/token/", response_model=AccessToken, name="users:login-email-and-password")
async def user_login_with_email_and_password(
user_repo: UsersRepository = Depends(get_repository(UsersRepository)),
form_data: OAuth2PasswordRequestForm = Depends(OAuth2PasswordRequestForm),
) -> AccessToken:
user = await user_repo.authenticate_user(email=form_data.username, password=form_data.password)
if not user:
raise HTTPException(
status_code=HTTP_401_UNAUTHORIZED,
detail="Authentication was unsuccessful.",
headers={"WWW-Authenticate": "Bearer"},
)
access_token = AccessToken(access_token=auth_service.create_access_token_for_user(user=user), token_type="bearer")
return access_token
The login route is very similar to the registration route, except this time we’re using the authenticate_user method on our UsersRepository to check the validity of the submitted login credentials. If we don’t get a user, we raise an HTTP_401_UNAUTHORIZED exception. Otherwise, we send back an access token with the user encoded in it.
Let’s work on the authenticate_user method next.
from typing import Optional
# ...other code
class UsersRepository(BaseRepository):
# ...other code
async def authenticate_user(self, *, email: EmailStr, password: str) -> Optional[UserInDB]:
# make user user exists in db
user = await self.get_user_by_email(email=email)
if not user:
return None
# if submitted password doesn't match
if not self.auth_service.verify_password(password=password, salt=user.salt, hashed_pw=user.password):
return None
return user
Simple enough. We check to make sure that a user exists in our database with the submitted email. If not, we return None. Then we use our auth service to hash the user’s password with the stored salt and verify that it matches the hashed password we have stored for that user. If all things turn out alright, we return the user.
Run the tests and watch them all…fail? We’re seeing 400 error responses for every failed test as well - what’s up with that? Parsing the body for FastAPI’s OAuth2PasswordRequestForm requires the python-multipart library that we haven’t installed yet. A nice clue is provided by the FastAPI docs , but for those who haven’t read that section - we’ll dig in here.
To diagnose that this is, in fact, the problem, we open up our interactive documentation at localhost:8000/docs and try out the login route. Type in a username and password, then hit execute. If we switch to our terminal running Docker, we should see a log statement that looks like:
server_1 | ERROR: Error getting request body: The `python-multipart` library must be installed to use form parsing.
So, let’s set that up.
# app
fastapi==0.55.1
uvicorn==0.11.3
pydantic==1.4
email-validator==1.1.1
python-multipart==0.0.5
# db
databases[postgresql]==0.4.2
SQLAlchemy==1.3.16
alembic==1.4.2
# auth
pyjwt==2.0.1
passlib[bcrypt]==1.7.2
# dev
pytest==6.2.2
pytest-asyncio==0.12.0
httpx==0.12.1
asgi-lifespan==1.0.0
Stop the running container and then make sure to rebuild a new one.
docker-compose up --build
Once the container has finished builing, go ahead and run all tests in the test_users.py file like so:
docker ps
docker exec -it [CONTAINER_ID] bash
pytest -v tests/test_users.py
And just like that, they’re passing. Fantastic.
So now that users can sign up for our app and login, let’s add a protected route that sends them information about themselves.
Auth Dependencies
To protect an endpoint in FastAPI, we’ll need to create a few auth dependencies meant to handle much of the grunt work. We’ll start by taking a page right out of FastAPI’s documentation and defining a /me/ route that returns the currently signed in user. That route will use our auth dependencies to ensure a token is included in the Authorization header and that the token is valid. If it is, we’ll return the user encoded in the token.
Let’s make a new fixture that we’ll use to make authorized requests.
Open up the tests/conftest.py file.
# ...other code
from app.core.config import SECRET_KEY, JWT_TOKEN_PREFIX
from app.services import auth_service
# ...other code
@pytest.fixture
def authorized_client(client: AsyncClient, test_user: UserInDB) -> AsyncClient:
access_token = auth_service.create_access_token_for_user(user=test_user, secret_key=str(SECRET_KEY))
client.headers = {
**client.headers,
"Authorization": f"{JWT_TOKEN_PREFIX} {access_token}",
}
return client
Our authorized_client fixture is the first example we’ve seen of how an access token will be used when making authorized requests to our API. We start by creating an access token for our test_user as we’ve seen before. Then, we take that token, prepend the appropriate prefix (“Bearer ”) and add it to the Authorization header of our client fixture.
Now, whenever we want to test authorized requests in our tests, we can use this authorized_client fixture instead of the generic client fixture.
Open up the tests/test_users.py file and add a couple tests to the TestAuthToken class.
# ...other code
from fastapi import FastAPI, HTTPException, status
# ...other code
class TestAuthTokens:
# ...other code
async def test_can_retrieve_username_from_token(
self, app: FastAPI, client: AsyncClient, test_user: UserInDB
) -> None:
token = auth_service.create_access_token_for_user(user=test_user, secret_key=str(SECRET_KEY))
username = auth_service.get_username_from_token(token=token, secret_key=str(SECRET_KEY))
assert username == test_user.username
@pytest.mark.parametrize(
"secret, wrong_token",
(
(SECRET_KEY, "asdf"), # use wrong token
(SECRET_KEY, ""), # use wrong token
(SECRET_KEY, None), # use wrong token
("ABC123", "use correct token"), # use wrong secret
),
)
async def test_error_when_token_or_secret_is_wrong(
self,
app: FastAPI,
client: AsyncClient,
test_user: UserInDB,
secret: Union[Secret, str],
wrong_token: Optional[str],
) -> None:
token = auth_service.create_access_token_for_user(user=test_user, secret_key=str(SECRET_KEY))
if wrong_token == "use correct token":
wrong_token = token
with pytest.raises(HTTPException):
username = auth_service.get_username_from_token(token=wrong_token, secret_key=str(secret))
We’re first testing to see that our auth service is capable of extracting a username from a valid JWT token. Next, we’re ensuring that if the token or secret is wrong in any way, we raise an HTTPException.
Run those tests and make sure they fail. We haven’t implemented the get_username_from_token method so let’s do that now.
from typing import Optional
from fastapi import HTTPException, status
from pydantic import ValidationError
# ...other code
class AuthService:
# ...other code
def get_username_from_token(self, *, token: str, secret_key: str) -> Optional[str]:
try:
decoded_token = jwt.decode(token, str(secret_key), audience=JWT_AUDIENCE, algorithms=[JWT_ALGORITHM])
payload = JWTPayload(**decoded_token)
except (jwt.PyJWTError, ValidationError):
raise HTTPException(
status_code=status.HTTP_401_UNAUTHORIZED,
detail="Could not validate token credentials.",
headers={"WWW-Authenticate": "Bearer"},
)
return payload.username
And we run our tests again and this time they should all pass. Good.
All we’re doing here is decoding whatever token is passed in and raising an HTTPException if there is a problem decoding the token.
Let’s test the one protected route we’re about to make. This route will take advantage of our get_username_from_token method in auth dependencies we’ll define in a minute.
First things, create a new test class in test_users.py.
from app.models.user import UserPublic
# ...other code
class TestUserMe:
async def test_authenticated_user_can_retrieve_own_data(
self, app: FastAPI, authorized_client: AsyncClient, test_user: UserInDB,
) -> None:
res = await authorized_client.get(app.url_path_for("users:get-current-user"))
assert res.status_code == HTTP_200_OK
user = UserPublic(**res.json())
assert user.email == test_user.email
assert user.username == test_user.username
assert user.id == test_user.id
async def test_user_cannot_access_own_data_if_not_authenticated(
self, app: FastAPI, client: AsyncClient, test_user: UserInDB,
) -> None:
res = await client.get(app.url_path_for("users:get-current-user"))
assert res.status_code == HTTP_401_UNAUTHORIZED
@pytest.mark.parametrize("jwt_prefix", (("",), ("value",), ("Token",), ("JWT",), ("Swearer",),))
async def test_user_cannot_access_own_data_with_incorrect_jwt_prefix(
self, app: FastAPI, client: AsyncClient, test_user: UserInDB, jwt_prefix: str,
) -> None:
token = auth_service.create_access_token_for_user(user=test_user, secret_key=str(SECRET_KEY))
res = await client.get(
app.url_path_for("users:get-current-user"), headers={"Authorization": f"{jwt_prefix} {token}"}
)
assert res.status_code == HTTP_401_UNAUTHORIZED
Run those tests and watch them fail. We’ll fix the starlette.routing.NoMatchFound error by creating our /me/ route.
Open up the api/routes/users.py file and add the following:
# ...other code
@router.get("/me/", response_model=UserPublic, name="users:get-current-user")
async def get_currently_authenticated_user() -> UserPublic:
return None
Run the tests and watch them fail.
This is where things get interesting. We’re going to need to somehow inject the currently authenticated user into the /me/ route. Remember that we only know the user is logged in by the token passed to our routes in the Authentication header. Instead of parsing the request ourselves and searching for that token, we’re going to hand that responsibility over to FastAPI.
We’ll create an auth dependency that grabs the currently authenticated user from our database and injects that user into our route.
Go ahead and create a new file in the dependencies directory like so:
touch backend/app/api/dependencies/auth.py
And add the following code:
from typing import Optional
from fastapi import Depends, HTTPException, status
from fastapi.security import OAuth2PasswordBearer
from app.core.config import SECRET_KEY, API_PREFIX
from app.models.user import UserInDB
from app.api.dependencies.database import get_repository
from app.db.repositories.users import UsersRepository
from app.services import auth_service
oauth2_scheme = OAuth2PasswordBearer(tokenUrl=f"{API_PREFIX}/users/login/token/")
async def get_user_from_token(
*,
token: str = Depends(oauth2_scheme),
user_repo: UsersRepository = Depends(get_repository(UsersRepository)),
) -> Optional[UserInDB]:
try:
username = auth_service.get_username_from_token(token=token, secret_key=str(SECRET_KEY))
user = await user_repo.get_user_by_username(username=username)
except Exception as e:
raise e
return user
def get_current_active_user(current_user: UserInDB = Depends(get_user_from_token)) -> Optional[UserInDB]:
if not current_user:
raise HTTPException(
status_code=status.HTTP_401_UNAUTHORIZED,
detail="No authenticated user.",
headers={"WWW-Authenticate": "Bearer"},
)
if not current_user.is_active:
raise HTTPException(
status_code=status.HTTP_401_UNAUTHORIZED,
detail="Not an active user.",
headers={"WWW-Authenticate": "Bearer"},
)
return current_user
So what’s going on here? Let’s first discuss the oauth2_scheme dependency we’ve created.
OAuth2PasswordBearer is a class we import from FastAPI that we can instantiate by passing it the path that our users will send their email and password to so that they can authenticate. This class simply informs FastAPI that the URL provided is the one used to get a token. That information is used in OpenAPI and in FastAPI’s interactive docs.
For us that path is located at /api/users/login/token/, and is our login route. That route looks like this:
@router.post("/login/token/", response_model=AccessToken, name="users:login-email-and-password")
async def user_login_with_email_and_password(
user_repo: UsersRepository = Depends(get_repository(UsersRepository)),
form_data: OAuth2PasswordRequestForm = Depends(OAuth2PasswordRequestForm),
) -> AccessToken:
user = await user_repo.authenticate_user(email=form_data.username, password=form_data.password)
if not user:
raise HTTPException(
status_code=HTTP_401_UNAUTHORIZED,
detail="Authentication was unsuccessful.",
headers={"WWW-Authenticate": "Bearer"},
)
access_token = AccessToken(access_token=auth_service.create_access_token_for_user(user=user), token_type="bearer")
return access_token
The oauth2_scheme variable is an instance of OAuth2PasswordBearer and is also a dependency, so we can use it with Depends. We do just that in our get_user_from_token function. By injecting the oauth2_scheme as a dependency, FastAPI will inspect the request for an Authorization header, check if the value is Bearer plus some token, and return the token as a str. If it doesn’t see an Authorization header, or the value doesn’t have a Bearer token, it will respond with an HTTP_401_UNAUTHORIZED status code for us.
Once that token has been injected into the get_user_from_token function, we use our auth_service to decode the token and search in our database for a user that matches the username in the token payload. If anything goes wrong, we raise an exception. Otherwise we return the user.
That get_user_from_token function is used a sub-dependency in our get_current_active_user function. This dependency takes in the user returned by our get_user_from_token function and ensures that they exist and are active. Otherwise it raises the appropriate exception.
If all goes well, we get our logged in user and can integrate it into any route we want protected.
Head back to the api/routes/users.py file and update it like so.
# ...other code
from app.api.dependencies.auth import get_current_active_user
from app.models.user import UserCreate, UserUpdate, UserInDB, UserPublic
# ...other code
@router.get("/me/", response_model=UserPublic, name="users:get-current-user")
async def get_currently_authenticated_user(current_user: UserInDB = Depends(get_current_active_user)) -> UserPublic:
return current_user
Run the tests one more time and watch them all pass.
The Interactive Docs
We’ve now done most of the work to implement a proper auth flow in our application and it’d be nice to test it out. Fortunately, FastAPI’s interactive docs make that easy. Head to localhost:8000/docs and there should be some new additions.
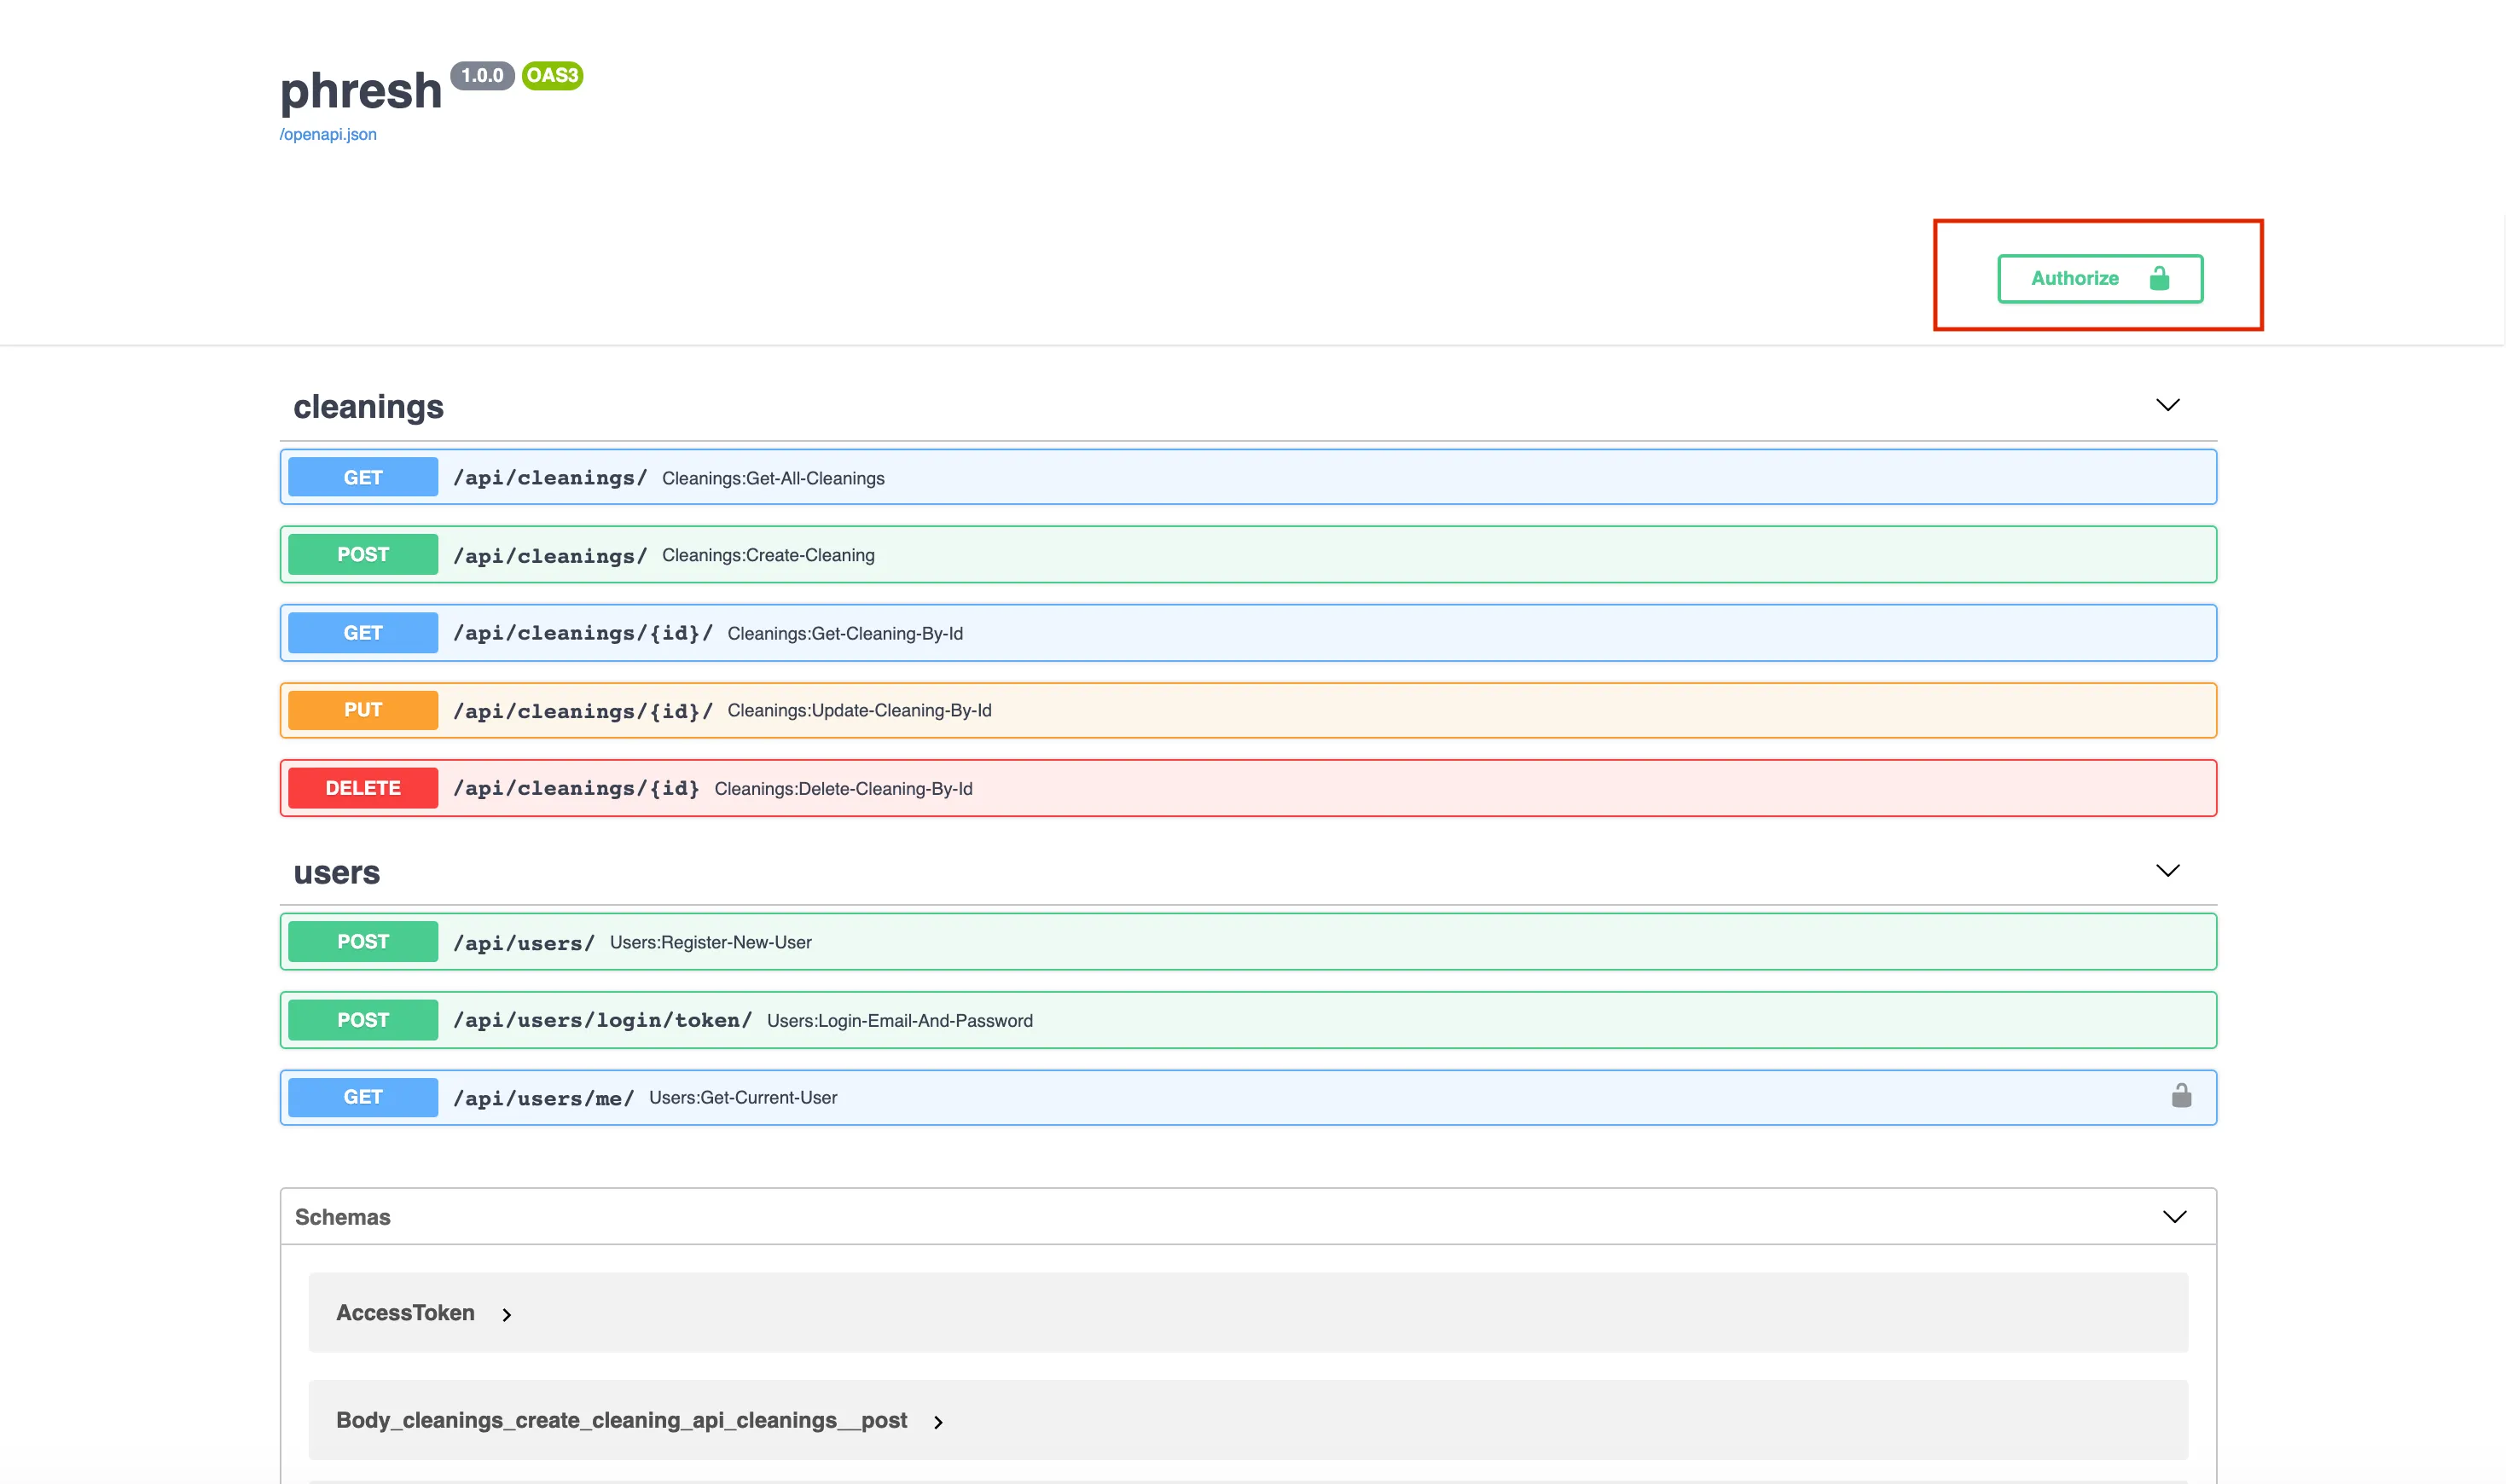
That authorize button in the top right lets us enter in an email and password for any user already in our database, and it will authenticate for us at the route we provided in our oauth2_scheme.
See that lock icon next to our new /api/users/me/ route? FastAPI knows that it’s a protected route and requires a token in the Authorization header. If we attempt to execute a request to that endpoint, we see a 401 response containing json { "detail": "Not authenticated" }.
If we then click on the authorize button and enter proper credentials, we should be able to execute that route and be provided with a UserPublic model corresponding to the authenticated user.
Amazing!
Wrapping Up and Resources
This app is finally beginning to come together. By fleshing out a complete registration and login system, we can now start to give users the ability to create cleanings and attach those resources to users in our database. In the next post, we’ll do just that. By the end, users should be able to post cleaning opportunities and other users should be able to offer their services for a given opportunity.
- FastAPI Security Intro docs
- FastAPI Security First Steps docs
- FastAPI Security Get Current User docs
- FastAPI Security Password OAuth2 docs
- FastAPI Security JWT OAuth2 docs
- Toptal: High-performing Apps with Python – blog post focused on building a todo app from scratch with FastAPI using the SQLAlchemy ORM.
Github Repo
All code up to this point can be found here:
