Managing Auth State With Redux

Welcome to Part 15 of Up and Running with FastAPI. If you missed part 14, you can find it here .
This series is focused on building a full-stack application with the FastAPI framework. The app allows users to post requests to have their residence cleaned, and other users can select a cleaning project for a given hourly rate.
Up And Running With FastAPI
In the last post, we used react-router to implement client-side navigation and built out login and registration pages so that users can sign up and log in to our application.
Right now our forms don’t actually submit the user’s authentication credentials to our server. In fact, our FastAPI server isn’t involved with our frontend at all. We’re going to change that in this post. We’ll start by setting up redux to manage global state for our application, and then we’ll use axios to make api calls to our server for authentication.
If you’ve heard scary things about redux, don’t worry. We’ll take it slow and move through each concept gradually.
The Redux Store
Since Dan Abramov introduced redux back in 2015, it has received a lot of praise and a lot of criticism. The home page describes redux as a predictable state container for javascript applications. That phrase is too vague and presents as more of a marketing soundbite than an actual description.
Redux is a pattern that makes managing global state easy to reason about. The library itself weighs in at less than 7kb and the react-redux bindings add another ~14kb.
So it’s less about the code than it is about the mental model.
Though, trust me, we’ll write a lot of redux code. That’s developers main gripe with redux: too much boilerplate. I understand the sentiment, but feel the benefits far outweight the costs.
A good way to understand redux is to build a mini version from scratch. Since the library itself is so small, we’ll do that here in <100 LOC.
Let’s get to the code.
At it’s core, redux consists of a single source of truth - the store - that holds our global state tree. In a standard app, we’d use the createStore function imported directly redux to set that up.
Here’s a very abbreviated version of what that function does.
function createStore(initialState = {}) {
let stateTree = initialState
function getState() {
return stateTree
}
return { getState }
}
// example usage
const store = createStore()
const stateTree = store.getState()
So the store is simply an object with a getState method. Calling getState returns the state tree object that is captured by a closure .
That seems simple enough, right. Observant readers have probably noticed that if that were all there is to it, there’d be no way to change the state tree. It’s important to know that this is by design. In redux we never mutate the state tree. Instead, we use actions and reducers to create a new state tree each time we need to change something.
Don’t get tripped up by the lingo. Seeing examples helps make things more clear.
An action is just an object that dictates what change to our state tree needs to occur.
For example, if we were building a music player app and a user clicks on their favorite song, our code would dispatch an action that looks like this:
const action = {
type: "CHANGE_SONG",
song: {
id: 3,
title: "Hips Don't Lie",
artist: "Shakira",
},
}
Every action must include a type property with a unique value identifying the action. Anything else included in the action is additional relevant data, but is not required. The type property is.
What does it mean to dispatch an action? Well, that’s actually the name of the next method on the redux store.
function createStore(initialState = {}) {
let stateTree = initialState
function getState() {
return stateTree
}
function dispatch(action) {
// figure out how to use the action to create a new state tree here
return action
}
return { getState, dispatch }
}
// example usage
const store = createStore()
const stateTree = store.getState()
store.dispatch({
type: "CHANGE_SONG",
song: {
id: 3,
title: "Hips Don't Lie",
artist: "Shakira",
},
})
const newStateTree = store.getState()
We want our dispatch method to figure out how to create a new state tree based on the action it was provided. That’s where our reducers come in. A reducer is a pure function that returns a new state tree using the dispatched action and the current state tree.
Here’s an example:
function songReducer(state = {}, action) {
switch (action.type) {
case "CHANGE_SONG":
return {
...state,
currentSong: action.song,
isPlaying: true,
}
case "PAUSE_SONG":
return {
...state,
isPlaying: false,
}
case "PLAY_SONG":
return {
...state,
isPlaying: true,
}
default:
return state
}
}
This songReducer function takes in the current state and an action and uses a switch statement to return a new object if the action.type matches any of the defined cases.
So what does it mean for a function to be pure?
It means that the function simply takes input and returns output. It never modifies its arguments or anything else outside the scope of the function. If it needs to change an argument, it just returns a new value. A good rule of thumb is that a pure function should always return the same value when provided a particular input.
The consequence of writing pure reducer functions is that we never mutate the store. Instead, our actions describe how the new state tree should look and our reducer makes that happen by copying parts that don’t change (all that ...state), and adding new values for what should be updated.
Let’s modify our createStore function to use the new songReducer function we just wrote.
import songReducer from "./songs"
function createStore(initialState = {}, reducer) {
let stateTree = initialState
let currentReducer = reducer
function getState() {
return stateTree
}
function dispatch(action) {
const newStateTree = currentReducer(stateTree, action)
return action
}
return { getState, dispatch }
}
// example usage
const store = createStore({}, songReducer)
const stateTree = store.getState()
Each time we dispatch an action, our store passes the current state and the action to our songReducer. It then replaces the current state tree with the result of calling the reducer, before returning the action.
Put together, they create a data flow that looks like this:
The reducer must return a new object each time it’s called, because that’s what redux uses to check if anything in the state tree has changed. So make sure that every reducer function is pure .
Sidetrack - Pure Functions
It’s important to understand the difference between a pure function and a function that has side effects, or mutations.
Here’s an example related to the fake music player app:
const playlist = {
title: "Shakira workout tunes",
songs: ["Hips Don't Lie", "She Wolf", "Chantaje"],
totalMinutes: 9.45,
}
const song = { title: "Waka Waka", minutes: 3.10 }
export default function addSongMutate(playlist, song) {
playlist.songs.push(song.title)
playllist.totalMinutes += song.minutes
return playlist
}
export default function addSongPure(playlist, song) {
return {
...playlist,
songs: [...playlist.songs, song.title],
totalMinutes: playlist.totalMinutes + song.minutes
}
}
The addSongMutate function manipulates the playlist object itself, while the addSongPure returns a brand new playlist object without making any changes to the original. It simply copied the parts of the playlist it wanted to keep and then made whatever updates were necessary. The ES6 ... Spread Operator makes copying objects and arrays easy and concise.
If we were to call addSongMutate with the playlist and song arguments multiple times, we’d get a different result on each subsequent execution. On the other hand, calling the addSongPure function with the playlist and song arguments would return the same result every time.
Back to Redux
Now, why are pure functions a good thing? Well, because our reducer functions are pure and our actions are just objects describing changes to the state tree, we can easily track what action lead to what change in our data. In fact, if we want to know when/how our state tree updated, we can replay each change to our state tree action by action. It’s called time-travel debugging .
There’s even a devtools extension for chrome and firefox that allows us to see all of this in one place. It’s highly recommended to download this extension as we’ll use it extensively.
In essence, the pattern introduced here makes changes to the state tree predictable , which is where the tagline we saw on the redux homepage comes from.
Alright, we’re almost done here. The last method we need to add to the store provides the ability to listen to changes in the state tree.
function createStore(initialState = {}, reducer) {
let stateTree = initialState
let currentReducer = reducer
let listeners = []
function getState() {
return stateTree
}
function dispatch(action) {
stateTree = currentReducer(stateTree, action)
listeners.forEach((listener) => listener())
return action
}
function subscribe(newListener) {
listeners.push(newListener)
return function unsubscribe() {
const index = listeners.indexOf(listener)
listeners.splice(index, 1)
}
}
return { getState, dispatch, subscribe }
}
This subscribe method is the primary way components will gain access to changes in our state tree. We wouldn’t want to have to call getState all the time just to see if something changed. Instead, the store keeps track of all listener callbacks internally and calls them whenever an action is dispatched. We also return an unsubscribe function in our subscribe method to allow consumers to stop listening at any point.
And that’s everything in a nutshell! Let’s put it all together in one place to see what we just did.
function createStore(initialState = {}, reducer) {
let stateTree = initialState
let currentReducer = reducer
let listeners = []
function getState() {
return stateTree
}
function dispatch(action) {
stateTree = currentReducer(stateTree, action)
listeners.forEach((listener) => listener())
return action
}
function subscribe(newListener) {
listeners.push(newListener)
return function unsubscribe() {
const index = listeners.indexOf(listener)
listeners.splice(index, 1)
}
}
return { getState, dispatch, subscribe }
}
function songReducer(state = {}, action) {
switch (action.type) {
case "CHANGE_SONG":
return {
...state,
currentSong: action.song,
isPlaying: true,
}
case "PAUSE_SONG":
return {
...state,
isPlaying: false,
}
case "PLAY_SONG":
return {
...state,
isPlaying: true,
}
default:
return state
}
}
const store = createStore({}, songReducer)
store.subscribe(() => console.log(store.getState()))
store.dispatch({
type: "CHANGE_SONG",
song: {
id: 3,
title: "Hips Don't Lie",
artist: "Shakira",
},
})
store.dispatch({ type: "PAUSE_SONG" })
store.dispatch({ type: "PLAY_SONG" })
store.dispatch({ type: "PAUSE_SONG" })
store.dispatch({ type: "PLAY_SONG" })
Try copy/pasting that code into the browser to see it in action.
Cool! It works as expected.
Go ahead and celebrate.
Alright. We’ve officially made it through the core redux philosophy.
At this point, many devs give up and decide redux isn’t for them. Don’t be put off by all the jargon and instead focus on writing code that accomplishes the goals of our app.
So, what is our goal here?
First things first, we want to create a redux store with a slice of state that manages authentication. So if the user is logged in, we want redux to reflect that, and visa versa.
Let’s get this ball rolling and create our store.
Setting Up Redux In Our Application
There’s a bit more to actually integrating redux into our application, so we’ll go over them as we get things setup.
Start by installing the @reduxjs/toolkit package that makes configuring our redux store easy as pie. The documentation for redux toolkit takes a slightly different approach to managing redux. We’ll only be using it for store configuration, but feel free to check out their docs for more info.
yarn add @reduxjs/toolkit
Then go ahead and create four new files at src/redux/store.js, src/redux/rootReducer.js, src/redux/auth.js, and src/redux/initialState.js.
touch src/redux/store.js src/redux/rootReducer.js src/redux/initialState.js src/redux/auth.js
Add the following to store.js:
import { configureStore, getDefaultMiddleware } from "@reduxjs/toolkit"
import rootReducer from "./rootReducer"
export default function configureReduxStore() {
const store = configureStore({
reducer: rootReducer,
middleware: [...getDefaultMiddleware()],
})
// enable hot reloading in development
if (process.env.NODE_ENV !== "production" && module.hot) {
module.hot.accept("./rootReducer", () => store.replaceReducer(rootReducer))
}
return store
}
We start by importing the configureStore and getDefaultMiddleware functions from @reduxjs/toolkit, along with our rootReducer that we haven’t created yet.
One thing we never discussed is middleware. Middlewares allow us to catch actions before they’re fired off to be handled by our reducers . We can then enhance them or do other fancy things like logging actions and reducer outputs. Fortunately, @reduxjs/toolkit comes prepackaged with middleware libraries that will help us catch mistakes in development and make it easy for us to hook our api calls up to our actions using redux-thunk.
Our configureReduxStore function also enables hot reloading in development to prevent our entire redux state tree from resetting when we make changes to our code, speeding up our development process.
Let’s move on to our initialState.js file.
export default {
auth: {
isLoading: false,
error: false,
user: {}
}
}
We’re just exporting a plain object as the initial state of our state tree. We namespace a nested auth section that will store all authentication-related state. We call this a slice of state.
For each slice of state, we’ll write a reducer that manages updates to that slice.
The first reducer we’ll deal with is the authReducer. Open up auth.js and add a reducer that looks like this:
import initialState from "./initialState"
export const REQUEST_LOGIN = "@@auth/REQUEST_LOGIN"
export const REQUEST_LOGIN_FAILURE = "@@auth/REQUEST_LOGIN_FAILURE"
export const REQUEST_LOGIN_SUCCESS = "@@auth/REQUEST_LOGIN_SUCCESS"
export const REQUEST_LOG_USER_OUT = "@@auth/REQUEST_LOG_USER_OUT"
export default function authReducer(state = initialState.auth, action = {}) {
switch(action.type) {
case REQUEST_LOGIN:
return {
...state,
isLoading: true,
}
case REQUEST_LOGIN_FAILURE:
return {
...state,
isLoading: false,
error: action.error,
user: {},
}
case REQUEST_LOGIN_SUCCESS:
return {
...state,
isLoading: false,
error: null,
}
case REQUEST_LOG_USER_OUT:
return {
...initialState.auth,
}
default:
return state
}
}
Instead of leaving the action types as strings, we’ve extracted them into constants for easier reuse. On top of that, it helps ensure that typos don’t screw up our auth flow later on.
Our reducer has 4 instruction types: REQUEST_LOGIN, REQUEST_LOGIN_FAILURE, REQUEST_LOGIN_SUCCESS, and REQUEST_LOG_USER_OUT. Three of those are login-related instructions that help represent the state of our application at each potential permutation in the authentication process.
- A user submits their email and password, and waits for our server to authenticate -
REQUEST_LOGIN - Our server sends back a response saying their password and email matched what we have in the system -
REQUEST_LOGIN_SUCCESS - An error occurred during the authentication process and we can’t log the user in -
REQUEST_LOGIN_FAILURE
The log user out function requires no API call, so we only need a single action type to represent it.
One thing we didn’t touch on is the ability to have multiple reducers. Redux allows us to package all of our reducers up into a single root reducer that assigns each reducer to the slice of state associated with it. So authReducer will handle the auth slice, cleaningReducer will handle the cleaning slice, and so on.
Let’s bundle this reducer into the rootReducer file that is being imported by our store.
import { combineReducers } from "redux"
import authReducer from "./auth"
const rootReducer = combineReducers({
auth: authReducer,
// other reducers will go here later
})
export default rootReducer
The combineReducers function from redux will call each reducer on its own slice of the state tree and stitch together the results for our store.
Not much else to see here!
All that’s left is bringing in the react-redux bindings to provide our redux store to components in our app. We’ll do so in the src/index.js file.
import React from "react"
import ReactDOM from "react-dom"
import { Provider } from "react-redux"
import { App } from "./components"
import configureReduxStore from "./redux/store"
const store = configureReduxStore()
ReactDOM.render(
<React.StrictMode>
<Provider store={store}>
{" "}
<App />
</Provider>{" "}
</React.StrictMode>,
document.getElementById("root")
)
At the top of the file we import the Provider component from react-redux. The Provider acts similarly to React’s Context.Provider, but instead of a value prop, it accepts a store prop. We simply create the store using our previously defined configureReduxStore function, and pass it to the Provider. In doing so, we can now “connect” any component we want to redux and give it access to our state tree.
Since we were smart and installed the redux-devtools-extension, we are able to see exactly what our state tree looks like at any moment:
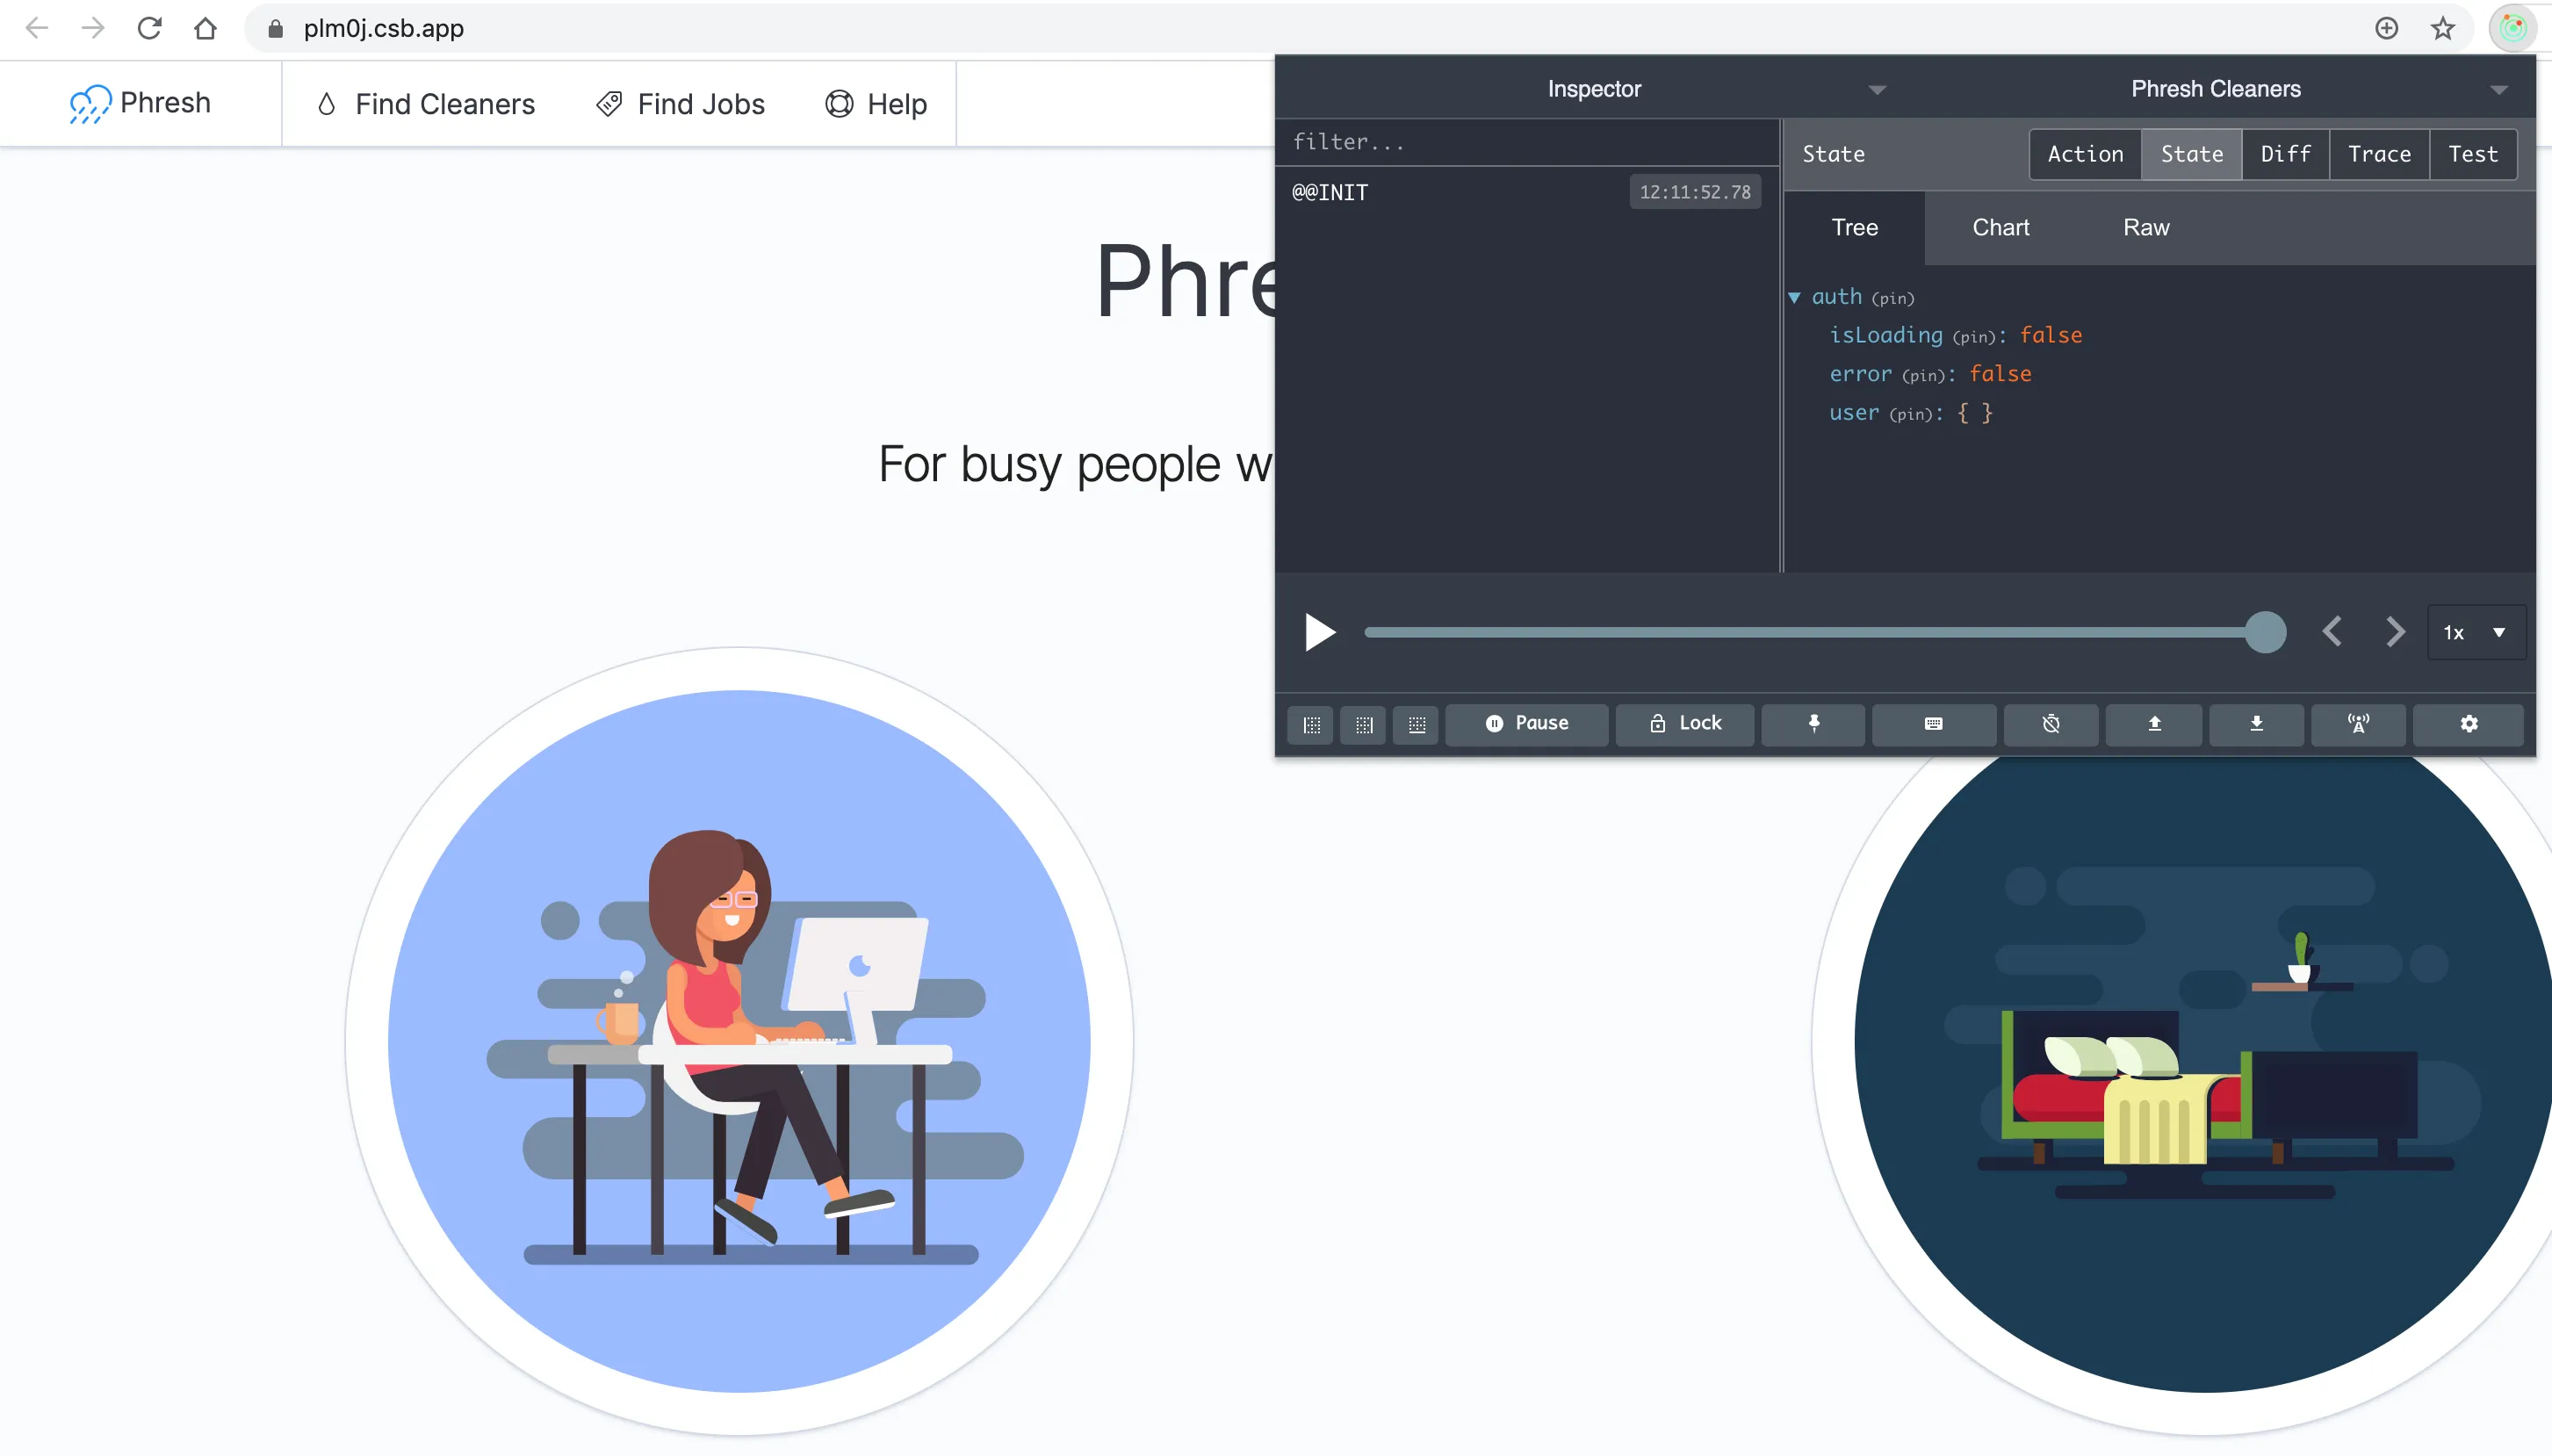
I know what some of you must be thinking. Quite a bit of work for something as simple looking as that! And to be honest, those folks are right. It is a lot of work. The payoff comes when the application grows and complexity increases. Then we’ll be thanking our lucky stars for redux.
Connecting Components With React-Redux
Thinking back to our LoginForm component, it’s expecting a requestUserLogin function as a prop. That function is called whenever the user submits the form and attempts to login. Instead of the dummy function we’re passing in now, let’s upgrade it to an action creator .
An action creator is exactly what it sounds like, it’s a function that creates and returns an action.
First, we’ll need to define that action creator.
import initialState from "./initialState"
export const REQUEST_LOGIN = "@@auth/REQUEST_LOGIN"
export const REQUEST_LOGIN_FAILURE = "@@auth/REQUEST_LOGIN_FAILURE"
export const REQUEST_LOGIN_SUCCESS = "@@auth/REQUEST_LOGIN_SUCCESS"
export const REQUEST_LOG_USER_OUT = "@@auth/REQUEST_LOG_USER_OUT"
export default function authReducer(state = initialState.auth, action = {}) {
switch(action.type) {
case REQUEST_LOGIN:
return {
...state,
isLoading: true,
}
case REQUEST_LOGIN_FAILURE:
return {
...state,
isLoading: false,
error: action.error,
user: {},
}
case REQUEST_LOGIN_SUCCESS:
return {
...state,
isLoading: false,
error: null,
}
case REQUEST_LOG_USER_OUT:
return {
...initialState.auth,
}
default:
return state
}
}
export const Actions = {}
Actions.requestUserLogin = ({ email, password }) => {
return { type: REQUEST_LOGIN }
}
Actions.logUserOut = () => {
return { type: LOG_USER_OUT }
}
We’re now exporting an Actions object with two methods. The first is a requestUserLogin action creator that always returns a REQUEST_LOGIN type action regardless of whether or not the user entered proper credentials (we’ll handle actual auth part in a minute).
Now you might think we just import the action creators and call them directly in our React components, but that’s not the case. Like all things redux, there’s a special way to connect components to our actions and store.
Head into the LoginForm.js component and make the following updates:
import React from "react"
import { connect } from "react-redux"
import { Actions as authActions } from "../../redux/auth"
import {
EuiButton,
EuiFieldText,
EuiForm,
EuiFormRow,
EuiFieldPassword,
EuiSpacer
} from "@elastic/eui"
import { Link } from "react-router-dom"
import validation from "../../utils/validation"
import styled from "styled-components"
const LoginFormWrapper = styled.div`
padding: 2rem;
`
const NeedAccountLink = styled.span`
font-size: 0.8rem;
`
function LoginForm({ isLoading, requestUserLogin }) {
const [form, setForm] = React.useState({
email: "",
password: ""
})
const [errors, setErrors] = React.useState({})
const validateInput = (label, value) => {
// grab validation function and run it on input if it exists
// if it doesn't exists, just assume the input is valid
const isValid = validation?.[label] ? validation?.[label]?.(value) : true
// set an error if the validation function did NOT return true
setErrors((errors) => ({ ...errors, [label]: !isValid }))
}
const handleInputChange = (label, value) => {
validateInput(label, value)
setForm((form) => ({ ...form, [label]: value }))
}
const handleSubmit = async (e) => {
e.preventDefault()
// validate inputs before submitting
Object.keys(form).forEach((label) => validateInput(label, form[label]))
// if any input hasn't been entered in, return early
if (!Object.values(form).every((value) => Boolean(value))) {
setErrors((errors) => ({ ...errors, form: `You must fill out all fields.` }))
return
}
await requestUserLogin({ email: form.email, password: form.password })
}
return (
<LoginFormWrapper>
<EuiForm
component="form"
onSubmit={handleSubmit}
isInvalid={Boolean(errors.form)}
error={[errors.form]}
>
<EuiFormRow
label="Email"
helpText="Enter the email associated with your account."
isInvalid={Boolean(errors.email)}
error={`Please enter a valid email.`}
>
<EuiFieldText
icon="email"
placeholder="user@gmail.com"
value={form.email}
onChange={(e) => handleInputChange("email", e.target.value)}
aria-label="Enter the email associated with your account."
isInvalid={Boolean(errors.email)}
/>
</EuiFormRow>
<EuiFormRow
label="Password"
helpText="Enter your password."
isInvalid={Boolean(errors.password)}
error={`Password must be at least 7 characters.`}
>
<EuiFieldPassword
placeholder="••••••••••••"
value={form.password}
onChange={(e) => handleInputChange("password", e.target.value)}
type="dual"
aria-label="Enter your password."
isInvalid={Boolean(errors.password)}
/>
</EuiFormRow>
<EuiSpacer />
<EuiButton type="submit" fill isLoading={isLoading}>
Submit
</EuiButton>
</EuiForm>
<EuiSpacer size="xl" />
<NeedAccountLink>
Need an account? Sign up <Link to="/registration">here</Link>.
</NeedAccountLink>
</LoginFormWrapper>
)
}
const mapStateToProps = (state) => ({
isLoading: state.auth.isLoading
})
const mapDispatchToProps = (dispatch) => ({
requestUserLogin: ({ email, password }) => dispatch(authActions.requestUserLogin({ email, password }))
})
export default connect(mapStateToProps, mapDispatchToProps)(LoginForm)
A lot of new stuff here, all react-redux related. We import the connect function from react-redux and the Actions object we defined in the auth.js file (aliased to authActions for clarity). Then, at the bottom of the file, we define two new functions - mapStateToProps and mapDispatchToProps. Both functions are passed to the connect higher-order function, which is responsible for injecting the result of store.getState() and the dispatch method into the component it wraps. In our case, we’re wrapping LoginForm with the connect function and exporting the results. We also remove the export default statement from our component definition.
Look carefully at the names of both of these new functions to understand what’s happening here.
The mapStateToProps function is the listener callback we saw when we defined our mini-redux store earlier. After connect injects the results of store.getState(), our listener maps a part of the state tree to our component props . We’ve chosen to pass whatever is stored at state.auth.isLoading as the isLoading prop to LoginForm.
For mapDispatchToProps, the connect component injects the store’s dispatch method into our callback, and we map the dispatch method to our wrapped component’s props as part of the requestUserlogin function.
So, our LoginForm component now has two props - isLoading and requestUserLogin - that are coming from redux. By leveraging the connect function, we can wire up any component in our application to our redux state tree.
Inside the LoginForm component, we’ve passed the isLoading prop to our submit button so that it shows a spinner while we’re waiting for the server to handle its business.
Check it out on Code Sandbox
phresh-frontend-part-3-setting-up-redux-for-auth-management
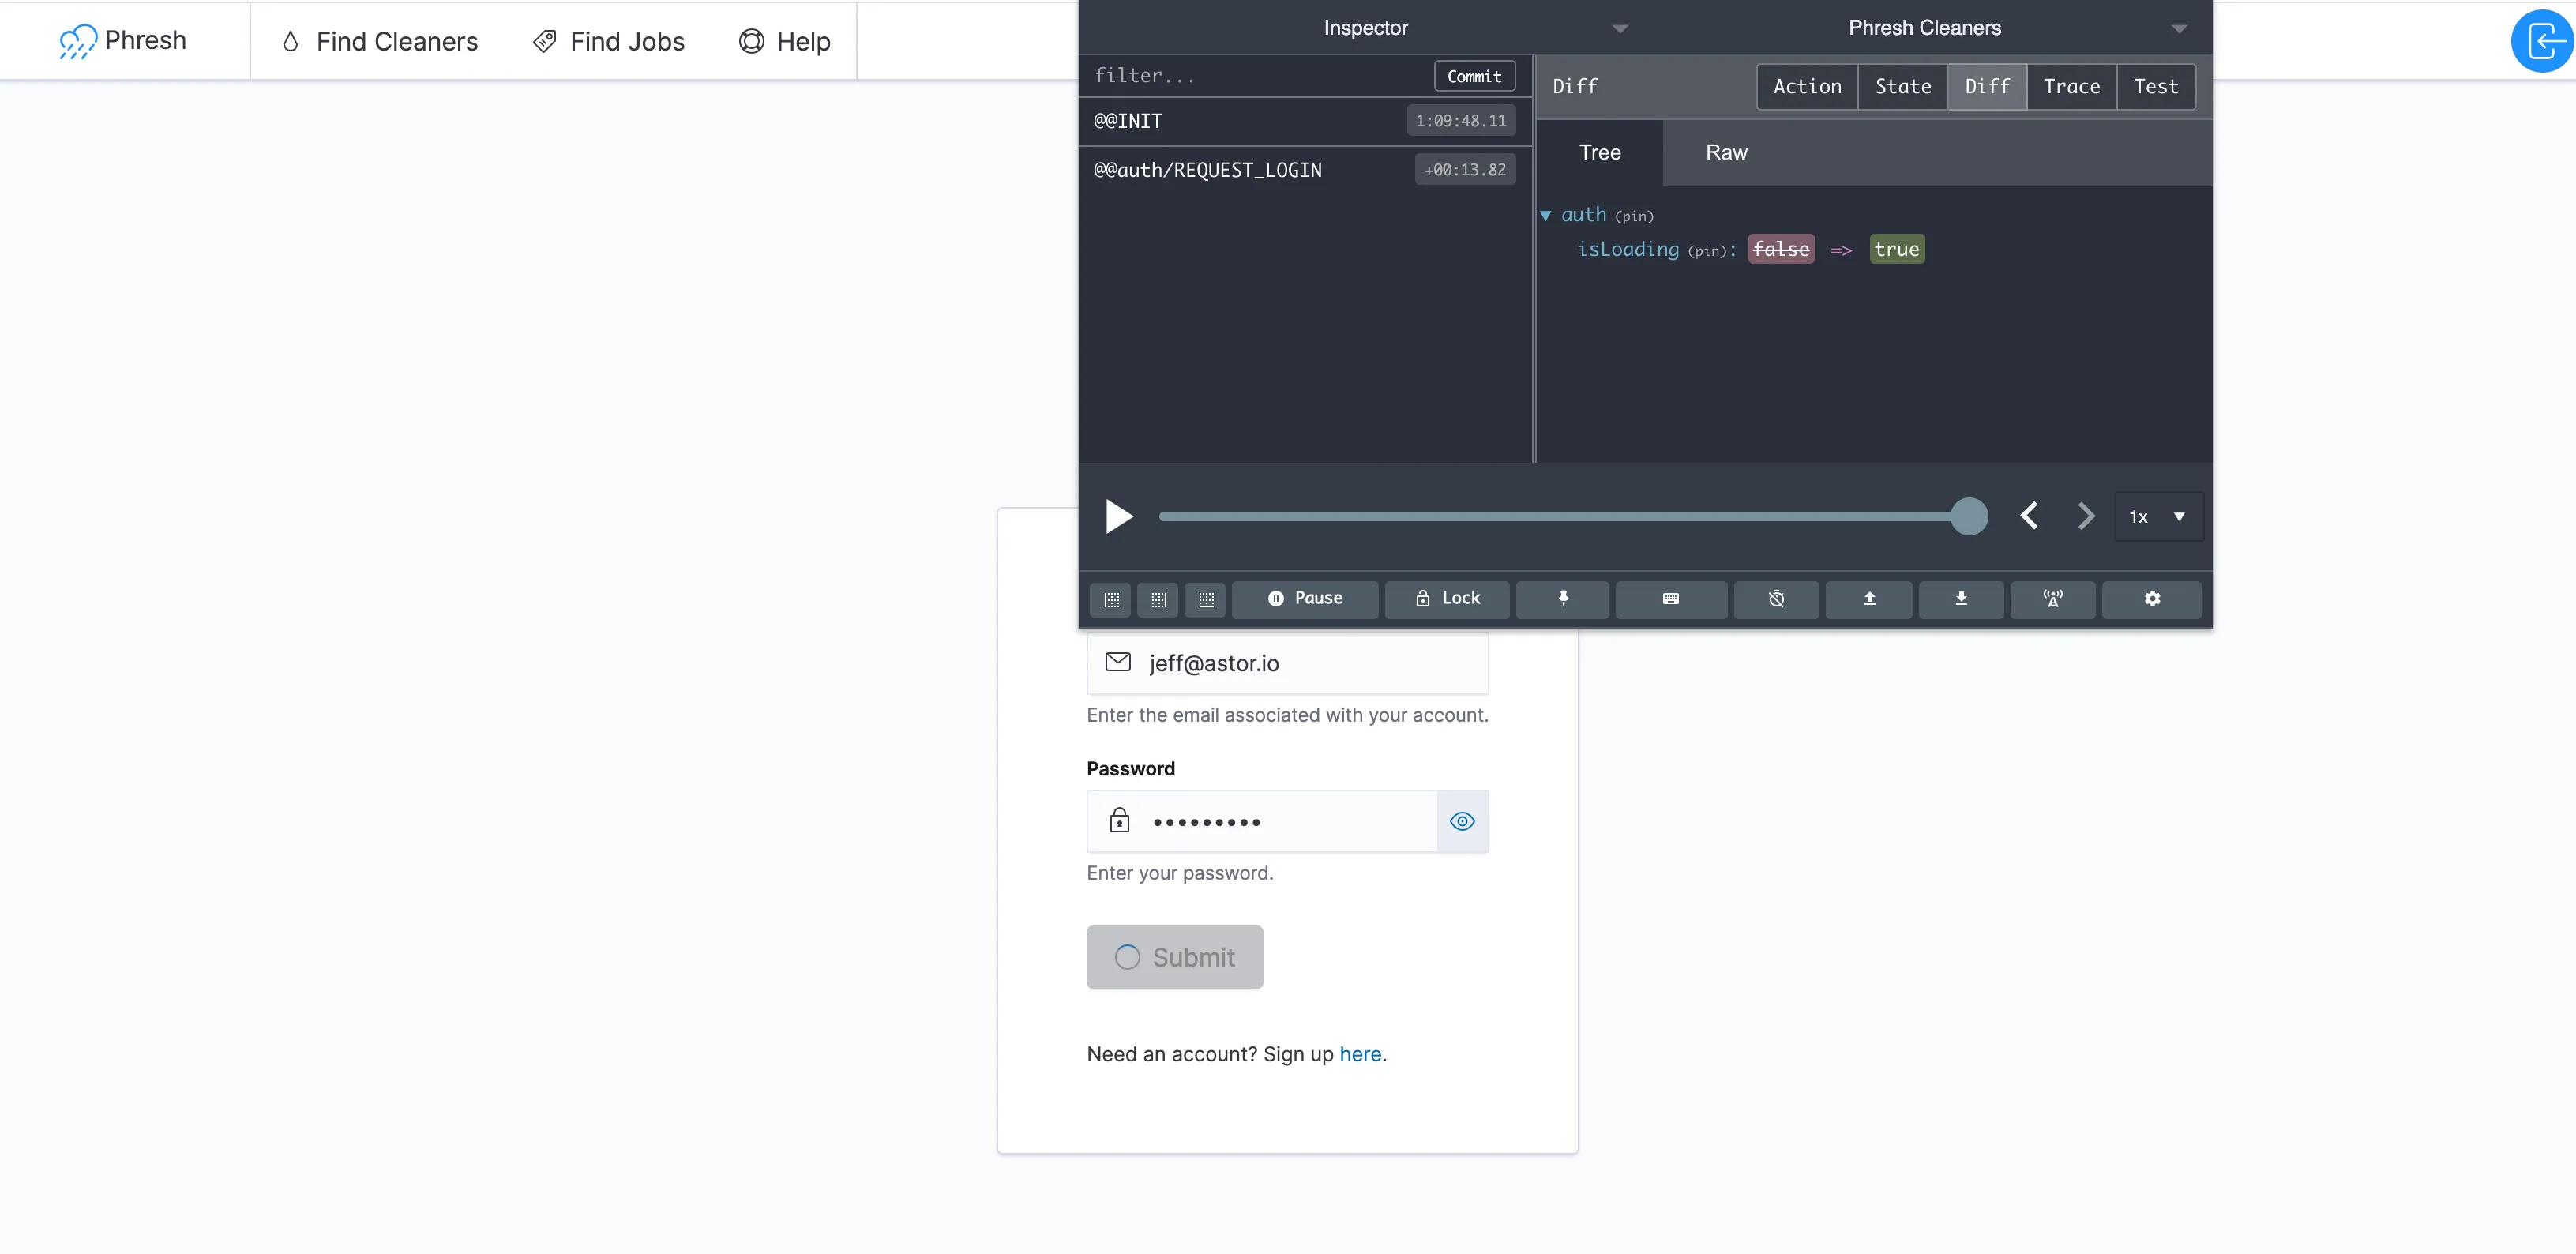
Let’s try submitting with any valid user and password combination.
What we see is that single action with the type equal to REQUEST_LOGIN has been fired, and that the state tree has been updated to show the isLoading as true. Our submit button is now stuck in a spinner state, since our action creator only handles one case.
Time to fire up our server.
Making HTTP Requests To Our FastAPI Server With Axios
We’re finally ready. The moment we’ve been building towards for the last 14 posts - a fully connected backend and frontend application.
Make sure that the server is running by punching out docker-compose up in the terminal. A good way to check that everything is ok is to open up localhost:8000/docs and make sure things look right. Under each section - cleanings, users, profiles, offers, and evaluations - we have a number of routes. Find the POST route with the /api/users/login/token/ path. If we click on that green bar, we see that the endpoint is expecting a form-encoded request body with the username and password fields required.
Modern JavaScript introduced a global fetch method to the language in recent years that provides a clean interface for making asynchronous HTTP requests from the browser. Coupled with the new async/await syntax, communicating between client and server has become significantly more manageable than it used to be.
Though fetch works fine in most situations, the axios library has emerged as my favorite promise-based client for making HTTP requests in a single-page application like the one we’re building.
Here’s how we’d make an HTTP request with axios:
import axios from "axios"
async function getRedditHomepageJson() {
const url = `https://www.reddit.com/.json`
try {
const res = await axios({
method: `GET`,
url: url,
headers: { "Content-Type": "application/json" },
})
const json = res.data
return json
} catch (err) {
console.log(err)
}
}
By declaring getRedditHomepageJson as an async function, we are able to await the results of the HTTP request and handle an errors through our try/catch statement. It looks like synchronous code, making it easy to figure out what’s going on.
So why don’t we just setup up all our action creator functions like this? Easy enough, right?
There’s one slight problem. By default, redux action creators must be synchronous and must return an action. So how are we supposed to make asynchronous HTTP requests?
That’s where the redux-thunk middleware comes in handy. According to the docs , redux middleware provides “a third-party extension point between dispatching an action, and the moment it reaches the reducer”. The redux-thunk library is a middleware that allows action creators to return functions instead of plain actions.
Here’s the whole middleware with a few parts shaved off:
function createThunkMiddleware() {
return ({ dispatch, getState }) =>
(next) =>
(action) => {
if (typeof action === "function") {
return action(dispatch, getState)
}
return next(action)
}
}
That’s it. Less than 10 lines of code.
All it does is take in the store’s dispatch and getState methods, and pass them to the action if the action creator returns a function instead of an object. Otherwise, the middleware calls next with the action to pass it directly on to the reducer.
So, how is this useful? Well, it means we can now make our action creators return asynchronous functions! Since those functions have access to the dispatch method, we can dispatch as many actions as we want inside the function.
By configuring our store with @reduxjs/toolkit, the thunk middleware comes packaged as part of the getDefaultMiddleware() call we added here:
import { configureStore, getDefaultMiddleware } from "@reduxjs/toolkit"
import rootReducer from "./rootReducer"
export default function configureReduxStore() {
const store = configureStore({
reducer: rootReducer,
middleware: [...getDefaultMiddleware()],
})
// enable hot reloading in development
if (process.env.NODE_ENV !== "production" && module.hot) {
module.hot.accept("./rootReducer", () => store.replaceReducer(rootReducer))
}
return store
}
What are we waiting for? Let’s give it a whirl.
Upgrading Our Action Creator
Open up the redux/auth.js file and modify the requestUserLogin function like so:
// ...other code
import axios from "axios"
// ...other code
Actions.requestUserLogin = ({ email, password }) => {
return async (dispatch) => {
// set redux state to loading while we wait for server response
dispatch({ type: REQUEST_LOGIN })
// create the url-encoded form data
const formData = new FormData()
formData.set("username", email)
formData.set("password", password)
// set the request headers
const headers = {
"Content-Type": "application/x-www-form-urlencoded",
}
try {
// make the actual HTTP request to our API
const res = await axios({
method: `POST`,
url: `http://localhost:8000/api/users/login/token/`,
data: formData,
headers,
})
console.log(res)
// stash the access_token our server returns
const access_token = res?.data?.access_token
localStorage.setItem("access_token", access_token)
// dispatch the success action
return dispatch({ type: REQUEST_LOGIN_SUCCESS })
} catch(error) {
console.log(error)
// dispatch the failure action
return dispatch({ type: REQUEST_LOGIN_FAILURE, error: error?.message })
}
}
}
// ...other code
Wow. Our action creator just got a whole lot bigger. It also is now dispatching three actions.
The REQUEST_LOGIN action as soon as we kick off the auth flow. That’ll set the isLoading flag in the state tree. Then, we compose the form data and configure our axios request headers. Next we await the response from our API inside of a try/catch block. If the request is successful, we set the access token in local storage and dispatch the REQUEST_LOGIN_SUCCESS action. As soon as an error pops up, we log it, and dispatch the REQUEST_LOGIN_FAILURE action.
To see our new function in action, head back to the LoginPage and try signing in with a email/password combination that we know doesn’t exist.
Doing so should result in a very brief loading state followed by a login failure that sets state.auth.error to "Request failed with status code 401". Check the terminal running the FastAPI server and check out the message logged to the screen. It should read something like this:
server_1 | INFO: 123.21.0.1:12345 - "POST /api/users/login/token/ HTTP/1.1" 401 Unauthorized
Even though redux shows that we had an error with our request, something doesn’t feel right. Notice how the UI didn’t display any errors? We’ll want to provide some visual feedback to let the user know that things went wrong.
// ...other code
import { Actions as authActions, REQUEST_LOGIN_SUCCESS } from "../../redux/auth"
// ...other code
function LoginForm({ authError, isLoading, requestUserLogin }) {
const [hasSubmitted, setHasSubmitted] = React.useState(false)
// ...other code
const handleSubmit = async (e) => {
// ...other code
setHasSubmitted(true)
const action = await requestUserLogin({ email: form.email, password: form.password })
// reset the password form state if the login attempt is not successful
if (action.type !== REQUEST_LOGIN_SUCCESS) setForm(form => ({ ...form, password: "" }))
}
const getFormErrors = () => {
const formErrors = []
if (authError && hasSubmitted) {
formErrors.push(`Invalid credentials. Please try again.`)
}
if (errors.form) {
formErrors.push(errors.form)
}
return formErrors
}
return (
<LoginFormWrapper>
<EuiForm
component="form"
onSubmit={handleSubmit}
isInvalid={Boolean(getFormErrors().length)}
error={getFormErrors()}
>
{/* ...other code */}
</EuiForm>
<EuiSpacer size="xl" />
<NeedAccountLink>
Need an account? Sign up <Link to="/registration">here</Link>.
</NeedAccountLink>
</LoginFormWrapper>
)
}
const mapStateToProps = (state) => ({
authError: state.auth.error,
isLoading: state.auth.isLoading
})
// ...other code
At the top of our file, we’ve imported the REQUEST_LOGIN_SUCCESS action type. We won’t do this all the time, but it’s nice to see how creating constants for our action types can have benefits down the road.
As soon as the user submits, we set the local hasSubmitted flag to true, so that any errors we get from our redux store will be considered valid for this authentication attempt. We then await the result of our requestUserLogin function and check to see if the action returned has a successful type. If not, we clear the password field and make the user type it in again.
On top of that, we’ve added the state.auth.error property from our redux state tree to our LoginForm as the authError prop. Then, we’ve extracted the form errors into their own getter function, which is aptly named getFormErrors. This simply constructs an array of error messages we’d like to display to the user when authentication fails. Again, we only show the authError if the user has already attempted to authenticate.
There are definitely more elegant ways to handle displaying errors messages, but we took the quickest and most direct approach.
Try logging in again with invalid credentials and see what happens. The error message that should pop up is exactly what we’re looking for.
Handling A Successful Authentication
I didn’t have a user saved in my database at the time, so I went to http://localhost:8000/docs and created one through the interactive openapi documentation page that FastAPI provides. Just click on the POST button for the /api/users/ path and enter in an email, password, and username. Hit execute and make sure that 201 response code is returned.
Once the user is created in the database, we can see what happens when the user logs in successfully.
Head back to the LoginPage and enter in the credentials for the user we just registered. Hit submit, wait a second, and then check out the redux extension and console in the dev tools. A couple things should pop out right away.
First of all, it worked! We see that an action with the REQUEST_LOGIN_SUCCESS type was dispatched. The console also shows a response object that returned data with an access_token. If we check out the Application tab in our dev tools and click on Local Storage, we should see an access_token key with the correct value.
But again, something is off. Even though the response gave us an access_token, we didn’t get the actual user and profile. For that, we’ll need to add another action creator.
Head back into the auth.js file and add the following:
// ... other code
export const FETCHING_USER_FROM_TOKEN = "@@auth/FETCHING_USER_FROM_TOKEN"
export const FETCHING_USER_FROM_TOKEN_SUCCESS = "@@auth/FETCHING_USER_FROM_TOKEN_SUCCESS"
export const FETCHING_USER_FROM_TOKEN_FAILURE = "@@auth/FETCHING_USER_FROM_TOKEN_FAILURE"
export default function authReducer(state = initialState.auth, action = {}) {
switch (action.type) {
// ...other code
case FETCHING_USER_FROM_TOKEN:
return {
...state,
isLoading: true
}
case FETCHING_USER_FROM_TOKEN_SUCCESS:
return {
...state,
isAuthenticated: true,
userLoaded: true,
isLoading: false,
user: action.data
}
case FETCHING_USER_FROM_TOKEN_FAILURE:
return {
...state,
isAuthenticated: false,
userLoaded: true,
isLoading: false,
error: action.error,
user: {}
}
default:
return state
}
}
export const Actions = {}
Actions.requestUserLogin = ({ email, password }) => {
return async (dispatch) => {
// ...other code
try {
// ...other code
dispatch({ type: REQUEST_LOGIN_SUCCESS })
// dispatch the fetch user from token action creator instead
return dispatch(Actions.fetchUserFromToken(access_token))
} catch (error) {
// ...other code
}
}
}
Actions.fetchUserFromToken = (access_token) => {
return async (dispatch) => {
dispatch({ type: FETCHING_USER_FROM_TOKEN })
const token = access_token ? access_token : localStorage.getItem("access_token")
const headers = {
"Content-Type": "application/json",
Authorization: `Bearer ${token}`
}
try {
const res = await axios({
method: `GET`,
url: `http://localhost:8000/api/users/me/`,
headers
})
console.log(res)
return dispatch({ type: FETCHING_USER_FROM_TOKEN_SUCCESS, data: res.data })
} catch (error) {
console.log(error)
return dispatch({ type: FETCHING_USER_FROM_TOKEN_FAILURE, error })
}
}
}
// ...other code
The fetchUserFromToken function is another rather large action creator that’s responsible for handling the HTTP request to the /api/users/me/ route. This endpoint extracts the token from the Authorization header, decodes it, and pulls the users from the database if they exist. We allow our action creator to take in the token as an argument, or just look for it in local storage.
The cool part is back in our requestUserLogin action creator. If the user successfully logs in, we take the access token found in res.data.access_token and dispatch our newly created fetchUserFromToken action creator with the token. Now, instead of returning the dispatched REQUEST_LOGIN_SUCCESS action, a successful authentication will return a FETCHING_USER_FROM_TOKEN_SUCCESS action.
Our authReducer handles these actions differently as well. If we successfully fetch the user from our token, we set that user in our redux state tree, along with isAuthenticated and userLoaded flags. These are really just for convenience and aren’t essential to making our app work.
One last thing before we give this a test run. Head back into the LoginForm component and update it with the following:
// ...other code
import { Actions as authActions, FETCHING_USER_FROM_TOKEN_SUCCESS } from "../../redux/auth"
import { useNavigate } from "react-router-dom"
// ...other code
function LoginForm({ user, authError, isLoading, isAuthenticated, requestUserLogin }) {
// ...other code
const navigate = useNavigate()
// if the user is already authenticated, redirect them to the "/profile" page
React.useEffect(() => {
if (user?.email && isAuthenticated) {
navigate("/profile")
}
}, [user, navigate, isAuthenticated])
const handleSubmit = async (e) => {
// ...other code
const action = await requestUserLogin({ email: form.email, password: form.password })
// reset the password form state if the login attempt is not successful
if (action?.type !== FETCHING_USER_FROM_TOKEN_SUCCESS) {
setForm(form => ({ ...form, password: "" }))
}
}
// ...other code
}
const mapStateToProps = (state) => ({
authError: state.auth.error,
isLoading: state.auth.isLoading,
isAuthenticated: state.auth.isAuthenticated,
user: state.auth.user,
})
// ...other code
Let’s go over these changes starting with the imports.
Instead of the REQUEST_LOGIN_SUCCESS action type, we’re importing the FETCHING_USER_FROM_TOKEN_SUCCESS action type. Since our requestUserLogin function returns the result of dispatching the fetchUserFromToken action creator, we’ll want to to check the results against the correct action type.
We’re also importing the useNavigate hook from react-router-dom, giving us access to programmatic navigation.
In our mapStateToProps function, we make sure to include the user object and isAuthenticated flag as props for our LoginForm component. We then add a React.useEffect hook that checks for changes to the user and isAuthenticated props. If the user is authenticated and has a valid email, we redirect them to the /profile page.
Try logging in again. As promised, this time a successful authentication immediately navigates us to the profile. And we’re officially logged in!
Check the redux state tree to see data about our authenticated user cached locally.
Buuuut…just like before, there’s a problem. Refresh the page and see what happens.
Where’d our user go? They’re not in the redux state tree anymore, but if we check local storage, we see that our access_token is still there.
That’s actually an easy fix. Ready?
Open up the redux/store.js file and add the following:
import { configureStore, getDefaultMiddleware } from "@reduxjs/toolkit"
import { Actions as authActions } from "./auth"
import rootReducer from "./rootReducer"
export default function configureReduxStore() {
const store = configureStore({
reducer: rootReducer,
middleware: [...getDefaultMiddleware()],
})
store.dispatch(authActions.fetchUserFromToken())
// enable hot reloading in development
if (process.env.NODE_ENV !== "production" && module.hot) {
module.hot.accept("./rootReducer", () => store.replaceReducer(rootReducer))
}
return store
}
Ah, ok. As soon as the store is created, we dispatch the fetchUserFromToken action creator. If a token exists in local storage, our action creator will find it and attempt to fetch the logged in user from our server. In the case that the token is invalid or expired, the user will no longer be logged in and asked to authenticate again.
Amazing!
One last improvement would be connecting the Navbar component to redux so that it can access our authenticated user data as well.
Try this one out independently and come back here for the solution when finished.
Ready?
Head into the Navbar.js component and add the following:
// ...other code
import { connect } from "react-redux"
// ...other code
function Navbar({ user, ...props }) {
// ...other code
}
export default connect((state) => ({ user: state.auth.user }))(Navbar)
Wow, that’s it? No need to define a mapStateToProps function. We simply write the listener callback inline and pass it directly to the connect wrapper. We don’t need to wire up any actions, so we only use the first argument. This will make sure that our Navbar gets access to our authenticated user in the redux store.
Now our top right navbar section no longer shows the login icon when the user is logged in. Instead, we’re given the abbreviation of the user’s full name (or just the letter “A” for “Anonymous” since no user.profile.full_name exists yet.) We could probably improve that later on, but there’s no need at the moment.
While we’re here, let’s add a popover menu to the Navbar which the user can sign out and access their profile from.
import React from "react"
import { connect } from "react-redux"
import { Actions as authActions } from "../../redux/auth"
import {
EuiAvatar,
EuiIcon,
EuiHeader,
EuiHeaderSection,
EuiHeaderSectionItem,
EuiHeaderSectionItemButton,
EuiHeaderLinks,
EuiHeaderLink,
EuiPopover,
EuiFlexGroup,
EuiFlexItem,
EuiLink
} from "@elastic/eui"
import { Link } from "react-router-dom"
import loginIcon from "../../assets/img/loginIcon.svg"
import styled from "styled-components"
const LogoSection = styled(EuiHeaderLink)`
padding: 0 2rem;
`
const AvatarMenu = styled.div`
display: flex;
justify-content: space-between;
min-width: 300px;
& .avatar-actions {
margin-left: 2rem;
}
`
function Navbar({ user, logUserOut, ...props }) {
const [avatarMenuOpen, setAvatarMenuOpen] = React.useState(false)
const toggleAvatarMenu = () => setAvatarMenuOpen(!avatarMenuOpen)
const closeAvatarMenu = () => setAvatarMenuOpen(false)
const handleLogout = () => {
closeAvatarMenu()
logUserOut()
}
const avatarButton = (
<EuiHeaderSectionItemButton
aria-label="User avatar"
onClick={() => user?.profile && toggleAvatarMenu()}
>
{user?.profile ? (
<EuiAvatar
size="l"
name={user.profile.full_name || "Anonymous"}
initialsLength={2}
imageUrl={user.profile.image}
/>
) : (
<Link to="/login">
<EuiAvatar size="l" color="#1E90FF" name="user" imageUrl={loginIcon} />
</Link>
)}
</EuiHeaderSectionItemButton>
)
const renderAvatarMenu = () => {
if (!user?.profile) return null
return (
<AvatarMenu>
<EuiAvatar
size="xl"
name={user.profile.full_name || "Anonymous"}
initialsLength={2}
imageUrl={user.profile.image}
/>
<EuiFlexGroup direction="column" className="avatar-actions">
<EuiFlexItem grow={1}>
<p>
{user.email} - {user.username}
</p>
</EuiFlexItem>
<EuiFlexItem grow={1}>
<EuiFlexGroup justifyContent="spaceBetween">
<EuiFlexItem grow={1}>
<Link to="/profile">Profile</Link>
</EuiFlexItem>
<EuiFlexItem grow={1}>
<EuiLink onClick={() => handleLogout()}>Log out</EuiLink>
</EuiFlexItem>
</EuiFlexGroup>
</EuiFlexItem>
</EuiFlexGroup>
</AvatarMenu>
)
}
return (
<EuiHeader style={props.style || {}}>
<EuiHeaderSection>
<EuiHeaderSectionItem border="right">
<LogoSection href="/">
<EuiIcon type="cloudDrizzle" color="#1E90FF" size="l" /> Phresh
</LogoSection>
</EuiHeaderSectionItem>
<EuiHeaderSectionItem border="right">
<EuiHeaderLinks aria-label="app navigation links">
<EuiHeaderLink iconType="tear" href="#">
Find Cleaners
</EuiHeaderLink>
<EuiHeaderLink iconType="tag" href="#">
Find Jobs
</EuiHeaderLink>
<EuiHeaderLink iconType="help" href="#">
Help
</EuiHeaderLink>
</EuiHeaderLinks>
</EuiHeaderSectionItem>
</EuiHeaderSection>
<EuiHeaderSection>
<EuiPopover
id="avatar-menu"
isOpen={avatarMenuOpen}
closePopover={closeAvatarMenu}
anchorPosition="downRight"
button={avatarButton}
panelPaddingSize="l"
>
{renderAvatarMenu()}
</EuiPopover>
</EuiHeaderSection>
</EuiHeader>
)
}
export default connect((state) => ({ user: state.auth.user }), {
logUserOut: authActions.logUserOut
})(Navbar)
The EuiPopover is taken directly from the elastic-ui docs on popovers with a custom AvatarMenu section written to mirror the “Portal content in the header” section found in the docs on headers. Inside the AvatarMenu we nest a link the user’s profile page and a button that calls the handleLogout function. All handleLogout does is close the popover and dispatch the logUserOut action creator.
Notice how we simply pass an object as the second argument to the connect wrapper? Normally, we’d put a mapDispatchToProps function there, but this approach is actually known as the Object shorthand form and is recommended in the react-redux docs. Each field of the mapDispatchToProps object is assumed to be an action creator, and will have dispatch bound to it automatically by react-redux.
This is almost always the approach we’ll be taking in this application, so no need to ever call dispatch manually again. But at least we know how it works!
One last thing we should probably handle. If we attempt to log out, the user will be removed from the redux store, which is good. But if we were to refresh our app, we’d still have a valid token sitting in local storage and our user would get authenticated again by our server.
So let’s make a single final adjustment before we end this section for the time being.
Open up the auth.js and edit the logUserOut action creator like so:
// ...other code
Actions.logUserOut = () => {
localStorage.removeItem("access_token")
return {
type: REQUEST_LOG_USER_OUT
}
}
And there we have it. Users can now sign in successfully and stay logged in until their token expires or they sign themselves out.
Check it out on Code Sandbox
phresh-frontend-part-3-making-api-calls-with-axios
Wrapping Up and Resources
No doubt this post has brought many readers to tears. Whether they are tears of sadness or tears of joy is still up in the air, but either way we’ve triumphed and we should be proud of ourselves.
Once again we’re putting off creating a profile page for another post but I feel that’s more than fair given how much work we just did. We still need to get our sign up functionality working anyway!
We’ll handle all that in the next post, along with protecting routes from users who aren’t yet logged in.
If you missed any of the links or documentation, here’s a good place to catch up:
- Redux docs
- Redux Dev Tools Chrome extension
- React-Redux docs
- Redux toolkit docs
- Axios repo
- Elastic UI Popover docs

Frontend Navigation with React Router
Client-Side Protected Routes and User Registration