Designing A Feed Page For A FastAPI App

Welcome to Part 22 of Up and Running with FastAPI. If you missed part 21, you can find it here .
This series is focused on building a full-stack application with the FastAPI framework. The app allows users to post requests to have their residence cleaned, and other users can select a cleaning project for a given hourly rate.
Up And Running With FastAPI
In the previous post, we implemented an endpoint that servers a paginated list of cleaning jobs for a new feed page. We’ll follow that up by designing a page to consume that endpoint and display a traditional feed for authenticated users.
Enable Absolute imports
Before we get to any serious code, let’s do a bit of convenience configuration in our project. Relative, nested imports can start to be a nuisance when we want to reorganize code or move files around.
We’re going to enable absolute imports in our react project so that we can turn imports like this:
import { UserAvatar } from "../../components"
import { capitalize } from "../../utils/format"
into this:
import { UserAvatar } from "components"
import { capitalize } from "utils/format"
Fortunately, that’s a pretty simple process. All that’s needed is a jsconfig.json file at the root of the project (the same can be accomplished with Typescript with a tsconfig file).
touch jsconfig.json
And add the following to it:
{
"compilerOptions": {
"baseUrl": "src"
},
"include": ["src"]
}
We’re simply indicating that create react app should use the src directory as an import base path, meaning any directory or file that is a direct child can be imported with the same syntax of an npm package.
While we won’t be modifying all our imports right at this moment, it’s definitely something that an eager developer could accomplish in a short time. We will be using absolute imports for the rest of this tutorial series, so just be aware of the change.
If there are any readers that feel like this just isn’t their thing, don’t worry about it! It’s completely opt in. Relative imports will still work fine.
Creating An Activity Feed Component
A feed page that displays recent activity is standard for most modern applications. Even so, deciding what to display and how to display it can get tricky. Fortunately, elastic-ui is going to make a lot of the “how” decisions for us. Much of the code we’re going to use can be pulled from the EuiCommentList docs , so feel free to play around with it first.
Let’s start by creating a new component called CleaningActivityFeed.js:
mkdir src/components/CleaningActivityFeed
touch src/components/CleaningActivityFeed/CleaningActivityFeed.js
Inside that component, add some React boilerplate and some dummy content straight from the elastic-ui docs.
import React from "react"
import {
EuiAvatar,
EuiButtonIcon,
EuiText,
EuiBadge,
EuiFlexGroup,
EuiFlexItem,
EuiCommentList
} from "@elastic/eui"
import styled from "styled-components"
const Wrapper = styled.div`
display: flex;
flex-direction: column;
`
const body = (
<EuiText size="s">
<p>
Far out in the uncharted backwaters of the unfashionable end of the western spiral arm of the
Galaxy lies a small unregarded yellow sun.
</p>
</EuiText>
)
const copyAction = (
<EuiButtonIcon title="Custom action" aria-label="Custom action" color="subdued" iconType="copy" />
)
const complexEvent = (
<EuiFlexGroup responsive={false} alignItems="center" gutterSize="s">
<EuiFlexItem grow={false}>added tags</EuiFlexItem>
<EuiFlexItem grow={false}>
<EuiBadge color="primary">sample</EuiBadge>
</EuiFlexItem>
<EuiFlexItem grow={false}>
<EuiBadge color="secondary">review</EuiBadge>
</EuiFlexItem>
</EuiFlexGroup>
)
const complexUsername = (
<EuiFlexGroup responsive={false} alignItems="center" gutterSize="s">
<EuiFlexItem grow={false}>
<EuiAvatar size="s" type="space" name="Pedro" />
</EuiFlexItem>
<EuiFlexItem grow={false}>pedror</EuiFlexItem>
</EuiFlexGroup>
)
const longBody = (
<EuiText size="s">
<p>
This planet has - or rather had - a problem, which was this: most of the people living on it
were unhappy for pretty much of the time. Many solutions were suggested for this problem, but
most of these were largely concerned with the movements of small green pieces of paper, which
is odd because on the whole it was not the small green pieces of paper that were unhappy.
</p>
</EuiText>
)
const avatar = (
<EuiAvatar imageUrl="https://source.unsplash.com/64x64/?woman" size="l" name="Juana" />
)
const comments = [
{
username: "janed",
event: "added a comment",
timestamp: "on Jan 1, 2020",
children: body,
actions: copyAction
},
{
username: "juanab",
type: "update",
actions: copyAction,
event: "pushed incident X0Z235",
timestamp: "on Jan 3, 2020",
timelineIcon: avatar
},
{
username: "pancho1",
type: "update",
event: "edited case",
timestamp: "on Jan 9, 2020"
},
{
username: complexUsername,
type: "update",
actions: copyAction,
event: complexEvent,
timestamp: "on Jan 11, 2020",
timelineIcon: "tag"
},
{
username: "elohar",
event: "added a comment",
timestamp: "on Jan 14, 2020",
timelineIcon: <EuiAvatar size="l" name="Eloha" />,
children: longBody,
actions: copyAction
}
]
export default function CleaningActivityFeed() {
return (
<Wrapper>
<EuiCommentList comments={comments} />
</Wrapper>
)
}
Funny enough, most of the content is defined outside our main component, making the actual CleaningActivityFeed component itself barely 7 lines long. That won’t quite be the case once we incorporate real data from our backend, but it’s interesting to note. Everything is baked directly into the EuiCommentList component as the comments prop. Each item in the comments array has some of, or all of, the following attributes:
- username - the only required prop and represents the author of the comment. Display a small icon or avatar with it if needed.
- event - a title to describe what the event is all about
- type - use
updatewhen the comment is primarily showing info about actions that the user or the system has performed. Otherwise keep the default ofregular. - timestamp - time occurrence of the event
- timelineIcon - main icon that accompanies the comment. The default is
userfor regular comments anddotfor update comments. To customize, pass astringor anyReactNode. - actions - custom actions that the user can perform from the comment’s header
A collection of this info is used to generate different types of feed items and will help guide us as we craft the response coming from our FastAPI backend. We won’t take advantage of all that this component has to offer, so it’s nice to see that here first.
Go ahead and export that component:
export { default as App } from "./App/App"
export { default as Carousel } from "./Carousel/Carousel"
export { default as CarouselTitle } from "./CarouselTitle/CarouselTitle"
export { default as CleaningActivityFeed } from "./CleaningActivityFeed/CleaningActivityFeed"
export { default as CleaningJobCard } from "./CleaningJobCard/CleaningJobCard"
export { default as CleaningJobCreateForm } from "./CleaningJobCreateForm/CleaningJobCreateForm"
export { default as CleaningJobView } from "./CleaningJobView/CleaningJobView"
export { default as CleaningJobsHome } from "./CleaningJobsHome/CleaningJobsHome"
export { default as CleaningJobsPage } from "./CleaningJobsPage/CleaningJobsPage"
export { default as LandingPage } from "./LandingPage/LandingPage"
export { default as Layout } from "./Layout/Layout"
export { default as LoginForm } from "./LoginForm/LoginForm"
export { default as LoginPage } from "./LoginPage/LoginPage"
export { default as Navbar } from "./Navbar/Navbar"
export { default as NotFoundPage } from "./NotFoundPage/NotFoundPage"
export { default as ProfilePage } from "./ProfilePage/ProfilePage"
export { default as ProtectedRoute } from "./ProtectedRoute/ProtectedRoute"
export { default as RegistrationForm } from "./RegistrationForm/RegistrationForm"
export { default as RegistrationPage } from "./RegistrationPage/RegistrationPage"
And then bring it into our CleaningJobsHome component, which we will also refactor a bit.
import React from "react"
import { connect } from "react-redux"
import {
EuiAccordion,
EuiIcon,
EuiPage,
EuiPageBody,
EuiPageContent,
EuiPageContentBody,
EuiPageHeader,
EuiPageHeaderSection,
EuiTitle,
EuiSpacer
} from "@elastic/eui"
import { CleaningActivityFeed, CleaningJobCreateForm } from "components"
import styled from "styled-components"
const StyledEuiPage = styled(EuiPage)`
flex: 1;
& .create-new-job-button {
display: flex;
justify-content: center;
text-decoration: none;
& > span {
font-size: 1.2rem;
font-weight: bold;
}
&:hover {
& > span {
color: dodgerblue;
}
}
}
`
const StyledEuiPageHeader = styled(EuiPageHeader)`
display: flex;
justify-content: center;
align-items: center;
margin: 2rem;
& h1 {
font-size: 3.5rem;
}
`
function CleaningJobsHome({ user }) {
const newJobButtonContent = (
<>
<EuiIcon type="broom" size="l" /> Post A New Cleaning Job
</>
)
return (
<StyledEuiPage>
<EuiPageBody component="section">
<StyledEuiPageHeader>
<EuiPageHeaderSection>
<EuiTitle size="l">
<h1>Cleaning Jobs</h1>
</EuiTitle>
</EuiPageHeaderSection>
</StyledEuiPageHeader>
<EuiPageContent horizontalPosition="center">
<EuiPageContentBody>
<EuiAccordion
id="create-new-job-button"
arrowDisplay="none"
buttonContent={newJobButtonContent}
paddingSize="m"
buttonClassName="create-new-job-button"
>
<CleaningJobCreateForm />
</EuiAccordion>
</EuiPageContentBody>
</EuiPageContent>
<EuiSpacer />
<CleaningActivityFeed />
</EuiPageBody>
</StyledEuiPage>
)
}
export default connect((state) => ({ user: state.auth.user }))(CleaningJobsHome)
Alright, let’s see what we have here.
First, we bring in the EuiAccordion, EuiIcon, and EuiSpacer components along with the CleaningActivityFeed component we just wrote. We move our CleaningJobCreateForm into an accordian button that expands to show the form when clicked. At the same time, we adjust the spacing of our EuiPageContent component and add some nested styles to StyledEuiPage using styled-components. The EuiAccordion component has a buttonClassName prop that gives us access to the underlying DOM elements and lets us adjust our styles at will.
We also throw the CleaningActivityFeed component down below our accordion form so that we can check out the default content before we insert our application-specific data.
This codesandbox should reflect the changes we’ve made up to this point:
Check it out on Code Sandbox
phresh-frontend-part-9-designing-a-cleaning-feed
Pretty fly. We can see our EuiCommenList component rendering 5 different examples here.
Each EuiComment has two parts: a timelineIcon on the left and content on the right. The timelineIcon provides a visual indication of the type of comment it is - an icon representing the action performed or a user avatar for the owner of the item. The content has a header with all the relevant metadata and a body.
We can also see the comments with the update type are represented differently. We’ll be taking advantage of this to render our custom cleaning jobs feed.
First we’ll need a new feed slice in redux.
The Feed Redux Slice
We’ll need to set some initial state first, so let’s get to that.
export default {
auth: {
isLoading: false,
isUpdating: false,
isAuthenticated: false,
error: null,
user: {},
},
cleanings: {
isLoading: false,
isUpdating: false,
error: null,
data: {},
currentCleaningJob: null,
},
offers: {
isLoading: false,
isUpdating: false,
error: null,
data: {},
},
feed: {
isLoading: false,
error: null,
data: {},
hasNext: {},
},
}
Our setup for our feed shares most of the same attributes as the other slices, but also contains a hasNext key. We’ll get to that in a little bit.
Most of the rest of this code should look similar to our previous work with redux.
Create a new file at src/redux/feed.js:
touch src/redux/feed.js
And in that file we’ll add our standard action constants:
import moment from "moment"
import initialState from "redux/initialState"
import { REQUEST_LOG_USER_OUT } from "redux/auth"
import apiClient from "services/apiClient"
export const FETCH_CLEANING_FEED_ITEMS = "@@feed/FETCH_CLEANING_FEED_ITEMS"
export const FETCH_CLEANING_FEED_ITEMS_SUCCESS = "@@feed/FETCH_CLEANING_FEED_ITEMS_SUCCESS"
export const FETCH_CLEANING_FEED_ITEMS_FAILURE = "@@feed/FETCH_CLEANING_FEED_ITEMS_FAILURE"
Notice all the absolute imports? How nice!
We’re making some necessary imports and indicating the 3 states our application will be in when fetching the feed from FastAPI.
Now we’ll go ahead and create a reducer to use them in.
// ...other code
export default function feedReducer(state = initialState.feed, action = {}) {
switch (action.type) {
case FETCH_CLEANING_FEED_ITEMS:
return {
...state,
isLoading: true,
}
case FETCH_CLEANING_FEED_ITEMS_SUCCESS:
return {
...state,
isLoading: false,
error: null,
data: {
...state.data,
cleaning: action.data
},
}
case FETCH_CLEANING_FEED_ITEMS_FAILURE:
return {
...state,
isLoading: false,
error: action.error,
}
case REQUEST_LOG_USER_OUT:
return initialState.feed
default:
return state
}
}
This reducer is pretty simple at the moment. It sets the isLoading flag upon initially fetching and adds the data to our redux store when successful. Otherwise, it sets an error. We also clear our state when the user logs out.
We’ll need an action creator to go along with that.
// ...other code
export const Actions = {}
Actions.fetchCleaningFeedItems = (starting_date = new Date(), page_chunk_size = 20) => {
return (dispatch) => {
return dispatch(
apiClient({
url: `/feed/cleanings/`,
method: `GET`,
types: {
REQUEST: FETCH_CLEANING_FEED_ITEMS,
SUCCESS: FETCH_CLEANING_FEED_ITEMS_SUCCESS,
FAILURE: FETCH_CLEANING_FEED_ITEMS_FAILURE,
},
options: {
data: {},
params: {
starting_date: moment(starting_date).format(),
page_chunk_size,
},
},
onSuccess: (res) => {
return { success: true, status: res.status, data: res.data }
},
})
)
}
}
Our fetchCleaningFeedItems function accepts starting_date and page_chunk_size parameters and makes a request our cleaning feed endpoint, formatting our Date object as a string with the moment.js library. Notice how these are being passed into the params object instead of the data object? That’s because our FastAPI endpoint is expecting them as query parameters.
That’s all we’ll need to get started, though we will definitely be modifying this file again before the end of this post.
Make sure to wire this up in our rootReducer file as well.
import { combineReducers } from "redux"
import authReducer from "redux/auth"
import cleaningsReducer from "redux/cleanings"
import offersReducer from "redux/offers"
import feedReducer from "redux/feed"
const rootReducer = combineReducers({
auth: authReducer,
cleanings: cleaningsReducer,
feed: feedReducer,
offers: offersReducer
})
export default rootReducer
Before we start adding all this logic to one of our components. Let’s extract the core logic into a custom hook. We’ll call it useCleaningFeed.
A Custom Feed Hook
Go ahead and make that file:
touch src/hooks/useCleaningFeed.js
And in that file, we’ll put all the appropriate redux code associated with our cleaning feed.
import { useEffect, useCallback } from "react"
import { useDispatch, useSelector, shallowEqual } from "react-redux"
import { Actions as feedActions } from "redux/feed"
export function useCleaningFeed() {
const dispatch = useDispatch()
const isLoading = useSelector((state) => state.feed.isLoading)
const error = useSelector((state) => state.feed.error, shallowEqual)
const feedItems = useSelector((state) => state.feed.data?.cleaning, shallowEqual)
const hasFeedItems = Boolean(feedItems)
const fetchFeedItems = useCallback(
(starting_date, page_chunk_size) =>
dispatch(feedActions.fetchCleaningFeedItems(starting_date, page_chunk_size)),
[dispatch]
)
useEffect(() => {
if (!hasFeedItems) {
fetchFeedItems()
}
}, [hasFeedItems, fetchFeedItems])
return { isLoading, error, feedItems, fetchFeedItems }
}
Something new for a change! One of the places where the useDispatch and useSelector hooks shine is that they can be combined into custom hooks that encapsulate logic around a particular redux slice. This pattern accomplishes a few things:
- It keeps the body of our functional components clean
- It offers a composable abstraction over a
reduxslice, so that our components can bereduxagnostic - It gives us the ability to provide descriptive names for a disparate collection of functions, effects, and data
Though all valid, the third point is probably the most important. The things is, everything in our custom hook belongs together. By encapsulating related logic in our useCleaningFeed hook, we clearly designate the purpose of each item returned.
Now all we have to do is use it.
Before we get there though, let’s just make sure nothing is off.
Check it out on Code Sandbox
phresh-frontend-part-9-designing-a-cleaning-feed-redux-slice
Alright, now on to our CleaningActivityFeed.js file to test out our new custom hook.
Displaying Our Feed
We’re going to strip out most of the dummy code in our CleaningActivityFeed.js file and replace it with some actual data.
Here’s what we’ll start with:
import React from "react"
import moment from "moment"
import { EuiButton, EuiCommentList, EuiLoadingSpinner } from "@elastic/eui"
import { useCleaningFeed } from "hooks/useCleaningFeed"
import styled from "styled-components"
const Wrapper = styled.div`
width: 100%;
max-width: 800px;
margin: 2rem auto;
`
const renderTimestamp = (feedItem) => `on ${moment(feedItem.created_at).format("MMM Do, YYYY")}`
const createUiElementFromFeedItem = (feedItem) => {
const isCreateEvent = feedItem["event_type"] === "is_create"
return {
username: feedItem.owner?.username,
timestamp: renderTimestamp(feedItem),
type: isCreateEvent ? "regular" : "update"
}
}
export default function CleaningActivityFeed() {
const { isLoading, feedItems } = useCleaningFeed()
const feedItemElements = React.useMemo(
() => (feedItems ? feedItems.map((feedItem) => createUiElementFromFeedItem(feedItem)) : []),
[feedItems]
)
return (
<Wrapper>
<EuiCommentList comments={feedItemElements} />
{isLoading ? <EuiLoadingSpinner size="xl" /> : null}
<EuiButton onClick={() => {}} isLoading={false} isDisabled={true}>
Nothing else here yet...
</EuiButton>
</Wrapper>
)
}
Let’s break down what’s happening here.
We’re importing our new useCleaningFeed hook and calling it at the top of our component. As soon as the component mounts, our custom hook makes a request to the /feed/cleanings/ endpoint and gets back a sorted list of cleaning job events.
Our hook then grabs the data from our redux state tree and provide sthe list of feed items - along with an isLoading boolean - to the component. We destructure out each item from the hook’s return value for use in our component. This pattern makes it quite easy to now render UI elements based on the feed state without ever referencing redux in the file.
The component simply shows a loading spinner whenever we’re fetching feed items, and also renders a button that doesn’t do anything at the moment. As for our feed items, we convert them into barebones objects with only the username, timestamp, and type attributes. This is just enough to display some content and differentiate between create events and update events. We also memoize the results so we don’t have to recompute them on each render.
Create a few cleaning jobs under different accounts and make sure to update one of them.
After navigating back to this page, the results will look something like this:

Notice the single updated event in the middle? The icon and event body clearly delineate between the two event types. We can also our nice timestamp rendered using moment.js. Let’s go ahead and add the rest of the content to each event in our feed page.
Beefing Up The Feed
We’ll want to display an avatar for each user if possible, so let’s go ahead and abstract that logic into a new component called UserAvatar.js.
mkdir src/components/UserAvatar
touch src/components/UserAvatar/UserAvatar.js
And add the following:
import React from "react"
import { EuiAvatar } from "@elastic/eui"
import { getAvatarName } from "utils/format"
export default function UserAvatar({
user,
size = "l",
initialsLength = 1,
type = "user",
color = null
}) {
return (
<EuiAvatar
size={size}
name={getAvatarName(user)}
imageUrl={user?.profile?.image}
initialsLength={initialsLength}
type={type}
color={color}
/>
)
}
We’ve been using the EuiAvatar all over the place, so wrapping it in a standardized component will help prevent duplication in the future. Later on, we’ll go in and ensure that this component is used in place of standalone EuiAvatar components.
For now, all we’ll need to do is add a format.js file to the utils directory and create a getAvatarName function in it.
touch src/utils/format.js
In that file, place the following code:
export const capitalize = (str) =>
(str ? str[0].toUpperCase() + str.slice(1) : str)
export const getAvatarName = (user) =>
capitalize(user?.profile?.full_name) || capitalize(user?.username) || "Anonymous"
We’re exporting a function that capitalizes a given string, and a function that uses the capitalize function to parse a user object and return a formatted name for our UserAvatar component.
While we’re here, let’s go ahead and add two other formatting functions we’ll need in a moment
// ...other code
const currencyFormatter = new Intl.NumberFormat("en-US", {
style: "currency",
currency: "USD",
minimumFractionDigits: 2,
maximumFractionDigits: 2,
})
export const formatPrice = (price) => (price ? currencyFormatter.format(price) : price)
/**
* Take the first n characters of a string and add an ellipses at the end
* if the string is longer than n characters. Option to cut off at nearest
* word using the `useWordBoundary` flag
*
* @param {String} str - the string to truncate
* @param {Integer} n - the max number of characters
* @param {Boolean} useWordBoundary - whether or not to cut off at the nearest word
*/
export const truncate = (str, n = 200, useWordBoundary = false) => {
if (!str || str?.length <= n) return str
const subString = str.substr(0, n - 1)
return (useWordBoundary ? subString.substr(0, subString.lastIndexOf(" ")) : subString) + "…"
}
The next formatting function we’re dealing with is the formatPrice function. It leverages the built in Intl.NumberFormat object that enables language-sensitive number formatting with very little code. We instantiate a new instance and use it to format whatever price is passed in a US currency with 2 decimal place precision.
At the end of the file we export a truncate function which chops off a string after a certain number of characters and adds an ellipses to the end of it. We also add an additional parameter that specifies our function should stop at the last full word it encounters.
Nothing crazy here, just making our lives easier in the long run.
Make sure to export our new UserAvatar component as well.
export { default as App } from "./App/App"
export { default as Carousel } from "./Carousel/Carousel"
export { default as CarouselTitle } from "./CarouselTitle/CarouselTitle"
export { default as CleaningActivityFeed } from "./CleaningActivityFeed/CleaningActivityFeed"
export { default as CleaningJobCard } from "./CleaningJobCard/CleaningJobCard"
export { default as CleaningJobCreateForm } from "./CleaningJobCreateForm/CleaningJobCreateForm"
export { default as CleaningJobEditForm } from "./CleaningJobEditForm/CleaningJobEditForm"
export { default as CleaningJobOffersTable } from "./CleaningJobOffersTable/CleaningJobOffersTable"
export { default as CleaningJobView } from "./CleaningJobView/CleaningJobView"
export { default as CleaningJobsHome } from "./CleaningJobsHome/CleaningJobsHome"
export { default as CleaningJobsPage } from "./CleaningJobsPage/CleaningJobsPage"
export { default as LandingPage } from "./LandingPage/LandingPage"
export { default as Layout } from "./Layout/Layout"
export { default as LoginForm } from "./LoginForm/LoginForm"
export { default as LoginPage } from "./LoginPage/LoginPage"
export { default as Navbar } from "./Navbar/Navbar"
export { default as NotFoundPage } from "./NotFoundPage/NotFoundPage"
export { default as PermissionsNeeded } from "./PermissionsNeeded/PermissionsNeeded"
export { default as ProfilePage } from "./ProfilePage/ProfilePage"
export { default as ProtectedRoute } from "./ProtectedRoute/ProtectedRoute"
export { default as RegistrationForm } from "./RegistrationForm/RegistrationForm"
export { default as RegistrationPage } from "./RegistrationPage/RegistrationPage"
export { default as UserAvatar } from "./UserAvatar/UserAvatar"
Now let’s head back to our CleaningActivityFeed component and beef it up a bit.
import React from "react"
import moment from "moment"
import { useNavigate } from "react-router-dom"
import {
EuiBadge,
EuiButton,
EuiButtonIcon,
EuiCommentList,
EuiFlexGroup,
EuiFlexItem,
EuiLoadingSpinner,
EuiMarkdownFormat,
EuiText
} from "@elastic/eui"
import { useCleaningFeed } from "hooks/useCleaningFeed"
import { UserAvatar } from "components"
import { formatPrice, truncate } from "utils/format"
import styled from "styled-components"
const Wrapper = styled.div`
width: 100%;
max-width: 800px;
margin: 2rem auto;
`
const DescriptionWrapper = styled.div`
margin-bottom: 1rem;
`
const cleaningTypeToDisplayNameMapping = {
dust_up: "Dust Up",
spot_clean: "Spot Clean",
full_clean: "Full Clean",
}
const renderFeedItemBody = (feedItem) => (
<EuiText size="s">
<h3>{feedItem.name}</h3>
<DescriptionWrapper>
<EuiMarkdownFormat>{truncate(feedItem.description, 300, true)}</EuiMarkdownFormat>
</DescriptionWrapper>
<p>
Rate: <strong>{formatPrice(feedItem.price)}</strong>
</p>
</EuiText>
)
const renderUpdateEvent = (feedItem) => (
<EuiFlexGroup responsive={false} alignItems="center" gutterSize="s">
<EuiFlexItem grow={false}>
<span>
updated <strong>{feedItem.name}</strong>
</span>
</EuiFlexItem>
<EuiFlexItem grow={false}>
<EuiBadge className="hide-mobile" color="primary">
{cleaningTypeToDisplayNameMapping[feedItem.cleaning_type]}
</EuiBadge>
</EuiFlexItem>
<EuiFlexItem grow={false}>
<EuiBadge className="hide-mobile" color="secondary">
{formatPrice(feedItem.price)}
</EuiBadge>
</EuiFlexItem>
</EuiFlexGroup>
)
const renderFeedItemAction = (feedItem, navigate) => (
<EuiButtonIcon
title="Navigate to cleaning job"
aria-label="Navigate to cleaning job"
color="subdued"
iconType="popout"
onClick={() => navigate(`/cleaning-jobs/${feedItem.id}`)}
/>
)
const renderTimelineIcon = (feedItem) => <UserAvatar user={feedItem.owner} size="l" />
const renderTimestamp = (feedItem) => `on ${moment(feedItem.created_at).format("MMM Do YYYY")}`
const createUiElementFromFeedItem = (feedItem, navigate) => {
const isCreateEvent = feedItem["event_type"] === "is_create"
return {
username: feedItem.owner?.username,
timestamp: renderTimestamp(feedItem),
actions: renderFeedItemAction(feedItem, navigate),
event: isCreateEvent ? `created a new job` : renderUpdateEvent(feedItem),
type: isCreateEvent ? "regular" : "update",
timelineIcon: isCreateEvent ? renderTimelineIcon(feedItem) : null,
children: isCreateEvent ? renderFeedItemBody(feedItem) : null
}
}
export default function CleaningActivityFeed() {
const navigate = useNavigate()
const { isLoading, feedItems } = useCleaningFeed()
const feedItemElements = React.useMemo(
() => (feedItems ? feedItems.map((feedItem) => createUiElementFromFeedItem(feedItem, navigate)) : []),
[feedItems, navigate]
)
return (
<Wrapper>
<EuiCommentList comments={feedItemElements} />
{isLoading ? <EuiLoadingSpinner size="xl" /> : null}
<EuiButton onClick={() => {}} isLoading={false} isDisabled={true}>
Nothing else here yet...
</EuiButton>
</Wrapper>
)
}
Alright, quite a bit more going on here now. We’ve expanded the object returned by our createUiElementFromFeedItem function to include timelineIcon, event, children, and actions. Each one is responsible for a different piece of the event:
-
timelineIconrenders theUserAvatarcomponent we just created and imported at the top of the component. -
eventeither renders the messagecreated a new jobor a component showing that it was updated and displays badges for the type of cleaning job and the total hourly rate. -
childrenconditionally renders the body of the event. If it’s an update event, nothing is rendered. If it’s a create event, then we use our newly-craftedtruncatecomponent to render the first 300 characters of the job description, and we use theformatPricefunction to cleanly render the hourly rate for that job. -
actionsrenders anEuiButtonIconthat takes the user to the page for that cleaning job when clicked on.
And with those additions, we’re now presented with a page that looks something like this:
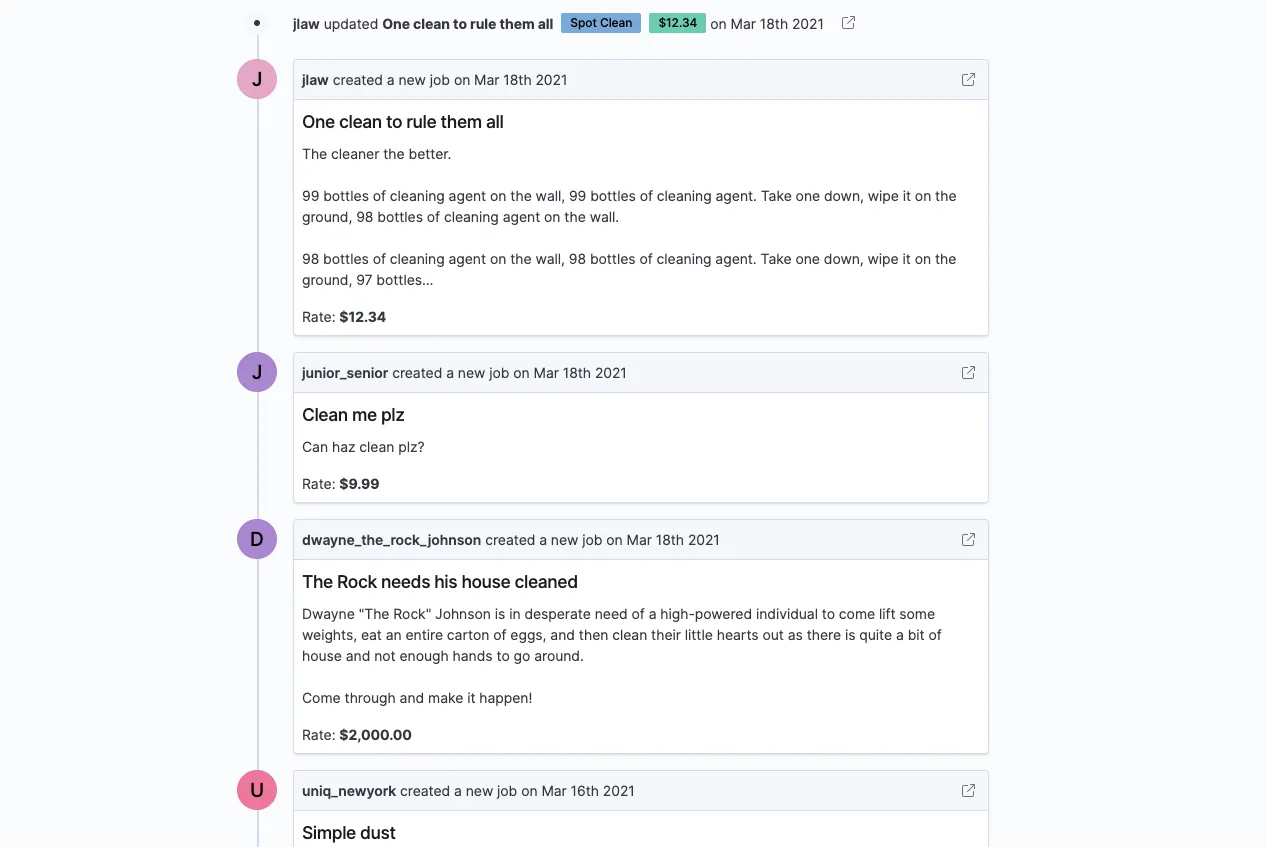
Wow!
That’s really coming together. One last thing and we can wrap this up for the day.
Applying the Finishing Touches
One thing we haven’t handled is how to request the next page of events after the initial fetch has happened.
There are a number of ways to accomplish this, but we’ll stick to the simplest possible approach.
First, we’ll handle the redux side of things.
// ...other code
export const SET_HAS_NEXT_FOR_FEED = "@@feed/SET_HAS_NEXT_FOR_FEED"
export default function feedReducer(state = initialState.feed, action = {}) {
switch (action.type) {
// ...other code
case FETCH_CLEANING_FEED_ITEMS_SUCCESS:
return {
...state,
isLoading: false,
error: null,
data: {
...state.data,
cleaning: [...(state.data.cleaning || []), ...action.data]
},
}
// ...other code
case SET_HAS_NEXT_FOR_FEED:
return {
...state,
hasNext: {
...state.hasNext,
[action.feed]: action.hasNext,
},
}
default:
return state
}
}
// ...other code
Actions.fetchCleaningFeedItems = (starting_date = new Date(), page_chunk_size = 20) => {
return (dispatch) => {
return dispatch(
apiClient({
url: `/feed/cleanings/`,
method: `GET`,
types: {
REQUEST: FETCH_CLEANING_FEED_ITEMS,
SUCCESS: FETCH_CLEANING_FEED_ITEMS_SUCCESS,
FAILURE: FETCH_CLEANING_FEED_ITEMS_FAILURE,
},
options: {
data: {},
params: {
starting_date: moment(starting_date).format(),
page_chunk_size,
},
},
onSuccess: (res) => {
dispatch({
type: SET_HAS_NEXT_FOR_FEED,
feed: "cleaning",
hasNext: Boolean(res?.data?.length === page_chunk_size),
})
return { success: true, status: res.status, data: res.data }
},
})
)
}
}
Well look at that! Not too bad. We’ve added less than 15 lines of code and we’re good to go.
All that’s happening is we’re dispatching a SET_HAS_NEXT_FOR_FEED action at hte conclusion of a successful request to our /feed/cleanings/ endpoint. If the results contain as many items as the chunk size for that request, we tell redux to set the hasNext attribute to true for the cleaning feed. Now this isn’t perfect. If there are only 20 events in our database, our redux state will indicate that there is more fetching to be done, even though that’s technically incorrect. However, that will be remedied on the next request, so it’s not terrible.
On top of that change, we modify our reducer in in the case that an FETCH_CLEANING_FEED_ITEMS_SUCCESS action is dispatched. When data is returned from our FastAPI cleaning feed endpoint, we now create a new list of feed items consisting of any currently present events (if there are any) and the new ones returned from our HTTP request.
Let’s add this item to our useCleaningFeed hook so we can leverage it in our component.
import { useEffect, useCallback } from "react"
import { useDispatch, useSelector, shallowEqual } from "react-redux"
import { Actions as feedActions } from "redux/feed"
export function useCleaningFeed() {
const dispatch = useDispatch()
const isLoading = useSelector((state) => state.feed.isLoading)
const error = useSelector((state) => state.feed.error, shallowEqual)
const hasNext = useSelector(state => Boolean(state.feed.hasNext.cleaning))
const feedItems = useSelector((state) => state.feed.data?.cleaning, shallowEqual)
const hasFeedItems = Boolean(feedItems)
const fetchFeedItems = useCallback(
(starting_date, page_chunk_size) =>
dispatch(feedActions.fetchCleaningFeedItems(starting_date, page_chunk_size)),
[dispatch]
)
useEffect(() => {
if (!hasFeedItems) {
fetchFeedItems()
}
}, [hasFeedItems, fetchFeedItems])
return { isLoading, error, hasNext, feedItems, fetchFeedItems }
}
We select the proper state from redux and add it to the object returned by our useCleaningFeed hook.
One other slight UX improvement that we could make is to request a fresh set of feed events each time our component is mounted to the screen. This will make sure that when a user creates a new job or edits their own job, their feed will be updated to reflect that. There are a number of other ways to prevent stale data (like using a library such as react-query ), but for our use case we only need to make a simple adjustment.
import { useEffect, useCallback } from "react"
import { useDispatch, useSelector, shallowEqual } from "react-redux"
import { Actions as feedActions } from "redux/feed"
export function useCleaningFeed() {
const dispatch = useDispatch()
const isLoading = useSelector((state) => state.feed.isLoading)
const error = useSelector((state) => state.feed.error, shallowEqual)
const hasNext = useSelector(state => Boolean(state.feed.hasNext.cleaning))
const feedItems = useSelector((state) => state.feed.data?.cleaning, shallowEqual)
const fetchFeedItems = useCallback(
(starting_date, page_chunk_size) =>
dispatch(feedActions.fetchCleaningFeedItems(starting_date, page_chunk_size)),
[dispatch]
)
useEffect(() => {
fetchFeedItems()
// eslint-disable-next-line react-hooks/exhaustive-deps
}, [])
return { isLoading, error, hasNext, feedItems, fetchFeedItems }
}
We’ve removed all dependencies from our useEffect hook, ensuring that it only executes upon first page load. Eslint will complain about the proper dependencies not being included, so we’ll disable them to avoid having to see that annoying warning. We’ve also removed the hasFeedItems variable, as it’s no longer needed.
Last, but not least, make the following updates in the CleaningActivityFeed file:
// ...other code
export default function CleaningActivityFeed() {
const navigate = useNavigate()
const { hasNext, isLoading, feedItems, fetchFeedItems } = useCleaningFeed()
const feedItemElements = React.useMemo(
() =>
feedItems ? feedItems.map((feedItem) => createUiElementFromFeedItem(feedItem, navigate)) : [],
[feedItems, navigate]
)
const handleLoadMore = () => {
const startingDate = feedItems[feedItems.length - 1].event_timestamp
fetchFeedItems(startingDate)
}
const renderHasNextButton = () => {
return hasNext ? (
<EuiButton onClick={handleLoadMore}>Load More</EuiButton>
) : (
<EuiButton onClick={() => {}} isLoading={false} isDisabled={true}>
{isLoading ? `Loading...` : `Nothing else here yet...`}
</EuiButton>
)
}
return (
<Wrapper>
<EuiCommentList comments={feedItemElements} />
{isLoading ? <EuiLoadingSpinner size="xl" /> : null}
{renderHasNextButton()}
</Wrapper>
)
}
And there ya have it.
We’ve extracted the button rendering into a function for readability and rendered different buttons depending on whether or not there are more events to fetch. We enable the button and provide an event handler that executes the handleLoadMore function when clicked. This new function is simply responsible for getting the next page of data when needed.
All it does is access the last item in our current feed, extract the timestamp from the event, and send it to our action creator. Remember that we format the timestamp with moment in the fetchCleaningFeedItems function, so no need to do anything else there..
Magnificient. Here’s what we should be looking at now.
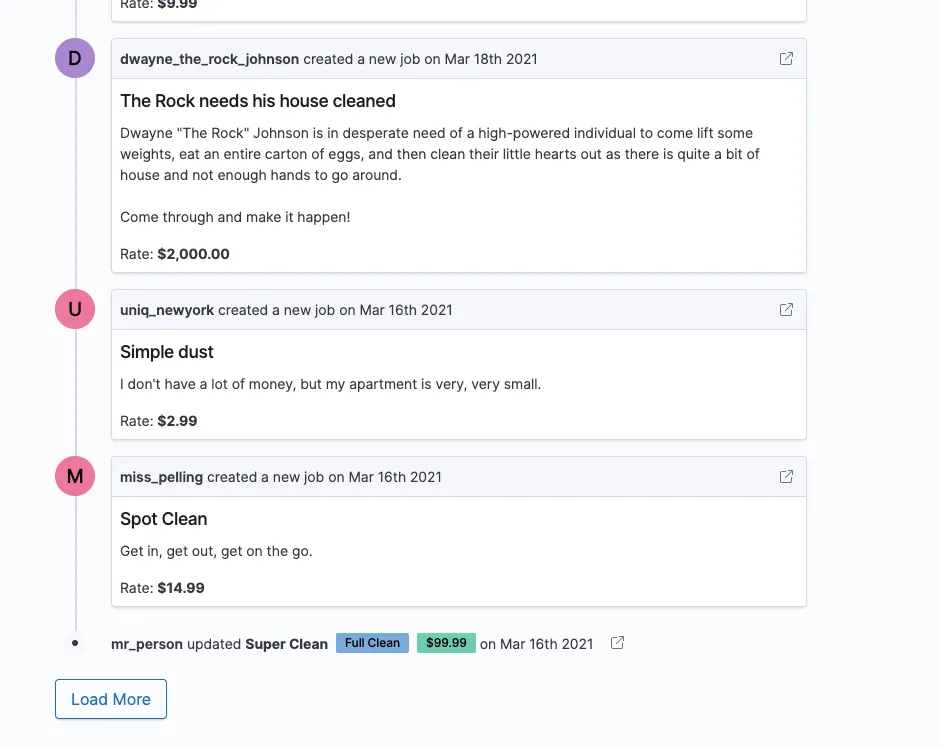
That works nicely!
And of course, the codesandbox with all the working code up to this point:
Check it out on Code Sandbox
phresh-frontend-part-9-using-the-custom-feed-hook
We’ll call it quits here.
Wrapping Up and Resources
Not bad for a full day’s work. We’re serving up a paginated activity feed from FastAPI and rendering each event in our CleaningActivityFeed component. Each page of feed events is fetched and managed using a combination of redux and custom hook logic, and we’ve simplified our import system with absolute imports.
Next up we’ll begin working on the UI for our evaluation system, giving users the ability to rate the quality of a cleaning job and view aggregate results for an individual.
- Create React App docs on absolute imports
- EuiCommentList docs
- EuiAvatar docs
- EuiButtonIcon docs
- EuiAccordion docs
- EuiMarkdownFormat docs
- Intl.NumberFormat docs from MDN

Serving A Paginated Activity Feed From FastAPI
Refactoring Our React UI Into Composable Hooks